This brief tutorial shows students and new users how to enable a Windows 10 built-in administrator account from the command line.
All Windows 10 computers come with a hidden built-in administrator account. This account is disabled by default. When setting up a new computer, you’re asked to create a user account. The first account you create will be added to the administrator’s group.
These administrator accounts fully control the local computer’s files, directories, services, and other resources. Practically, the administrator account has complete control of everything on the system.
The administrator accounts you create have full control but with UAC control protections. This is a way to provide some safeguards and protections before making mistakes. It makes you think twice with UAC confirmation prompts before actions are executed.
When logged in with the built-in administrator account, you can run commands and change the system’s settings, and UAC will not prompt you.
Using the built-in administrator account to manage your system can be dangerous. In most cases, you won’t get to confirm that you want to execute specific tasks before executing, even if the commands would damage the system.
To enable the built-in administrator account, follow the steps below:
Enable the built-in administrator account
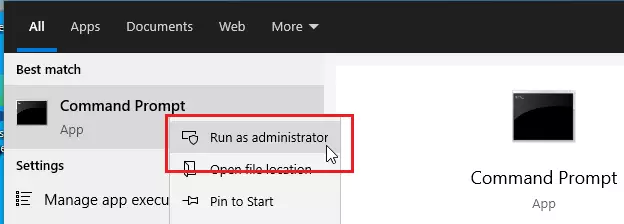
To enable the built-in administrator account from the command line prompt, open it as administrator, as shown in the image below.
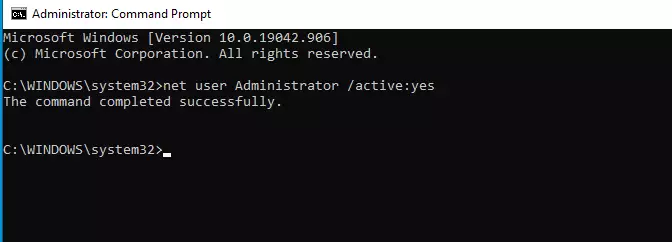
When the command prompt opens, run the commands below to enable the built-in administrator account in Windows 10.
net user Administrator /active:yes
After running the command, you should get a success message like the one below.
That will enable the account. However, you won’t be able to log in with it since you don’t know the password.
To enable the built-in administrator account and create a new password for it, run the commands below:
net user Administrator type_strong_passwore_here /active:yes
Please type_strong_password_here with the password you want to use with the administrator account.
With that, you should be able to log out from your current account and log in with the built-in administrator account that was initially disabled and hidden.
Disable the built-in administrator account
If you wish to deactivate the built-in administrator account, simply run the commands below from an elevated command prompt window.
net user Administrator /active:no
Running the above command will deactivate the built-in administrator account and hide it from the log-in Windows.
Conclusion:
- Enabling the built-in administrator account provides full control over the system without UAC prompts, but it carries risks.
- Always be cautious when performing administrative tasks, as you may inadvertently damage your system.
- To enable the built-in administrator account, use the command line to activate and set a secure password.
- Disable the account when it is no longer needed to maintain system security.
- Regularly review user accounts and permissions to ensure the security of your Windows 10 system.

Leave a Reply