
This tutorial shows you how to change the pen press and hold speed and duration for right-clicking in Windows 11.
You can pair a pen via Bluetooth to connect the pen with your Windows 11 PC and use it with the pen menu.
Why would you want to do this? If you find it takes too long to right-click with your pen, or if the timing feels off, you can adjust these settings to match how you work.
What happens when you change these settings? Your pen will respond faster or slower when you press and hold it on the screen. This makes right-clicking easier and more natural for you.
You can change how long you need to press and hold your pen tip before a right-click happens.
You can also change how long the press and hold action lasts when you perform a right-click.
Important: You must have “Enable press and hold for right-clicking” turned on before you can change these settings.
Reference:
Use a pen with Windows – Microsoft Support
Learn how to use a tablet pen with Windows for drawing, note-taking, and navigation. Discover pairing, settings, and productivity tips for an enhanced digital experience.
Option One
Change Pen Press and Hold Speed and Duration in Settings
- Open Settings by pressing
Win+I. - Click on Bluetooth & devices on the left side. Then click on Pen & Windows Ink on the right side.
Open Pen & Windows Ink settings

- Click on Additional pen settings to expand it open.
- Find the slider that says The amount of time you must press and hold to perform the gesture. Move it left for less time or right for more time.
The default time is 1 second. You can hover your mouse over the slider to see the current time.

- Close Settings when you are done.
Option Two
Change Touch Press and Hold Speed and Duration in Control Panel
- Open Control Panel in icons view. Click on the Pen and Touch icon.
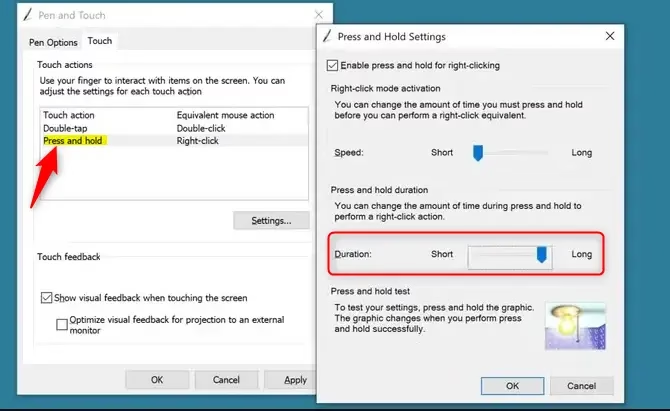
- Do the following:
- Click on the Pen Options tab.
- Select Press and hold.
- Click on Settings.
- Do the following:
- Adjust the Speed slider left (short) or right (long) to set how fast the right-click mode action happens.
- Adjust the Duration slider left (short) or right (long) to set how long the press and hold lasts.
- Click on OK.
You can press and hold on the light bulb graphic under Press and hold test to test your current settings.
- Click on OK again.
- Close Control Panel when you are done.
Option Three
Change Pen Press and Hold Speed in Registry Editor
- ⚠️ Requires admin privileges. Open Registry Editor by typing
regedit.exein the search box. - Navigate to this path in the left pane:
HKEY_CURRENT_USER\Software\Microsoft\Wisp\Pen\SysEventParameters - In the right pane, double-click on the WaitTime DWORD value.
- Select Decimal and type a number between 100 (short) and 5000 (long) for your press and hold speed.
The default speed is 300. Then click OK.
- Close Registry Editor when finished.
Option Four
Change Pen Press and Hold Duration in Registry Editor
- ⚠️ Requires admin privileges. Open Registry Editor by typing
regedit.exein the search box. - Navigate to this path in the left pane:
HKEY_CURRENT_USER\Software\Microsoft\Wisp\Pen\SysEventParameters - In the right pane, double-click on the HoldTime DWORD value.
- Select Decimal and type a number between 600 (short) and 4500 (long) for your press and hold duration.
The default duration is 2300. Then click OK.
- Close Registry Editor when finished.
Summary
You now know how to change your pen’s press and hold speed and duration in Windows 11. You have four options to choose from:
- Settings: The easiest way using the built-in Settings app.
- Control Panel: An older method that gives you a test feature to try out your settings.
- Registry Editor (Speed): For advanced users who want to adjust the speed value directly.
- Registry Editor (Duration): For advanced users who want to adjust the duration value directly.
All methods work in Windows 10 and Windows 11. Pick whichever method feels easiest for you.


Leave a Reply Cancel reply