
This brief tutorial shows students and new users how to boot into Windows safe mode.
When you log in to Windows, and you’re experiencing issues you can’t understand or know how to resolve, booting into Safe Mode might help you troubleshoot the problem.
Windows safe mode is a feature that starts Windows with a substantially reduced set of drivers and services. If the problem you’re having doesn’t happen in safe Mode, then it means Windows default settings, the operating systems, and primary drivers aren’t causing the issues.
Third-party drivers or other apps that are installed are causing the problem. Observing Windows in safe Mode lets you narrow down the source of a problem your computer is experiencing.
To get started with booting Windows in Safe Mode, follow the steps below:
Windows allows you to boot into three types of safe modes:
- Basic Windows 10 Safe Mode
- Windows 10 Safe Mode with Networking
- Windows 10 Safe Mode with Command Prompt
Each one has its pros and cons. In most instances, you should boot into Windows 10 safe mode with networking. This enables you to do more while in safe Mode.
Only users with administrative rights using the administrator command prompt can initiate safe Mode.
Open the Windows command prompt as administrator.

When the command prompt opens, run the commands below to boot into the Mode you wish to boot.
Basic Safe Mode
To boot Windows 10 in primary safe Mode, run the commands below and press Enter.
bcdedit /copy {Current} /d “Windows 10 Safe Mode"
Safe Mode with Networking
To boot Windows into safe Mode with networking, run the commands below and press Enter.
bcdedit /copy {Current} /d “Windows 10 Safe Mode with Networking”
Safe Mode with Command Prompt
To boot Windows into safe Mode with the command prompt, run the commands below:
bcdedit /copy {Current} /d “Windows 10 Safe Mode with Command Prompt”
When you select the Mode you want to boot, continue below to configure the Windows Boot Menu option.
Windows Boot Menu Option
The next step will be to open the Windows msconfig option. To get there, open the Windows command run Windows by pressing the Windows key + R on your keyboard.
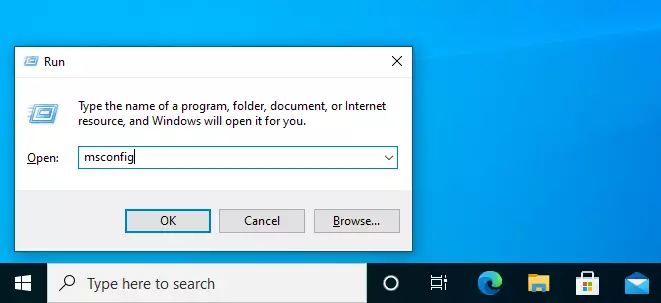
In the box, type the command below and press enter.
msconfig
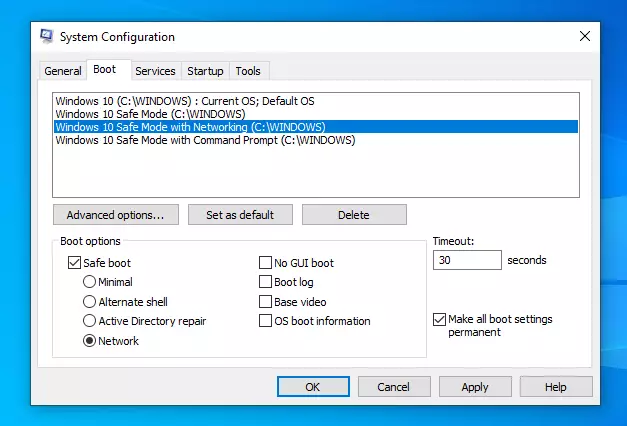
When the options windows open, select the Boot tab. Then, choose a setting that matches each of the safe mode options.
If you’re going to boot into Safe Mode with networking, select that, then choose the Boot options:
Safe boot:
- Network
- Make all boot settings permanent
For just primary Safe Mode, choose the Minimal option.
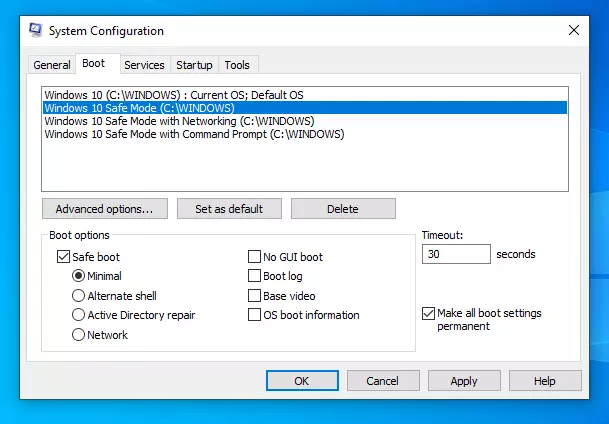
When you’re done, click OK.
When prompted if you want to continue, click Yes. You can safely ignore the warning because the above steps are reversible.
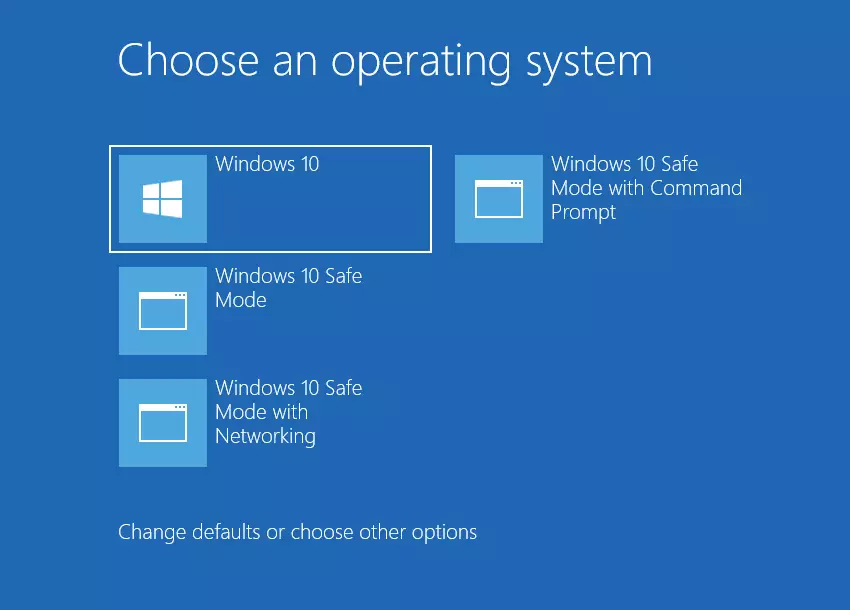
Restart when prompted.
You should get a similar boot option if everything goes as described above. Select the boot option you wish to enter.
That should do it!
Conclusion:
This post showed you how to boot into the Windows Safe Mode option. If you find any error above, please use the form below to report.


Leave a Reply Cancel reply