This brief tutorial shows students and new users how to enable virtual machines created on VirtualBox to communicate with each other.
Enabling VirtualBox VM-to-VM communication is important because it allows multiple virtual machines to communicate with each other, share resources, and work together in a networked environment.
This is especially useful when working on a project with multiple VMs that need to interact with each other. You may encounter issues when sharing files, accessing resources, or running applications across multiple virtual machines without enabling VM-to-VM communication.
For example, right out of the box, VirtualBox’s virtual machines cannot communicate with each other while attached to the default NAT network. VMs configured with the default NAT network can only access the Internet without VM-to-VM or Host IP communication.
To allow virtual machines to communicate with each other, you must change the VM network settings to use NAT Network, but you can’t use that Network setting if you haven’t already created it.
Below is the Network table for VMs. As you can see, VMs with NAT network settings cannot talk to the Host or other VMs but can’t get to the Internet.
VMs with NAT Network settings cannot talk to the Host computer but can communicate with other VMs and can’t go to the Internet.
| VM ↔ Host | VM1 ↔ VM2 | VM → Internet | VM ← Internet | |
|---|---|---|---|---|
| Host-only | + | + | – | – |
| Internal | – | + | – | – |
| Bridged | + | + | + | + |
| NAT | – | – | + | Port forwarding |
| NAT Network | – | + | + | Port forwarding |
To allow VMs to communicate with each other, attach the VMs to the NAT Network settings. Continue below to learn how to do that.
Create VirtualBox NAT Network
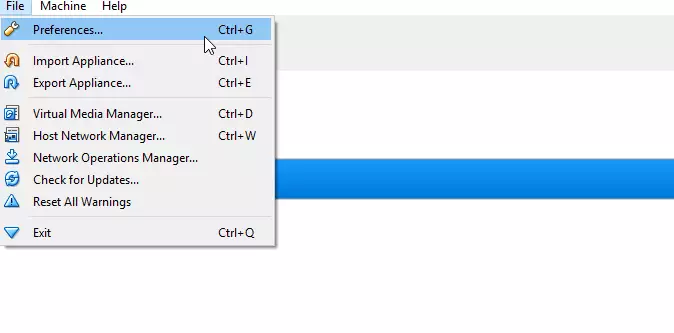
Before using NAT Network settings for VM, you must create a NAT Network interface. To do that, open VirtualBox software and click File ==> Preferences.
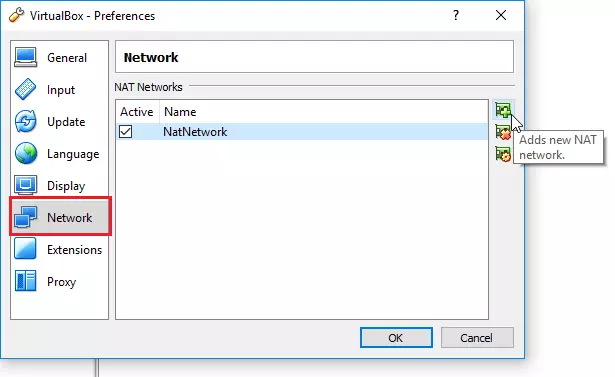
On the Preferences page, go to Network and click Add to create a new NAT Network.
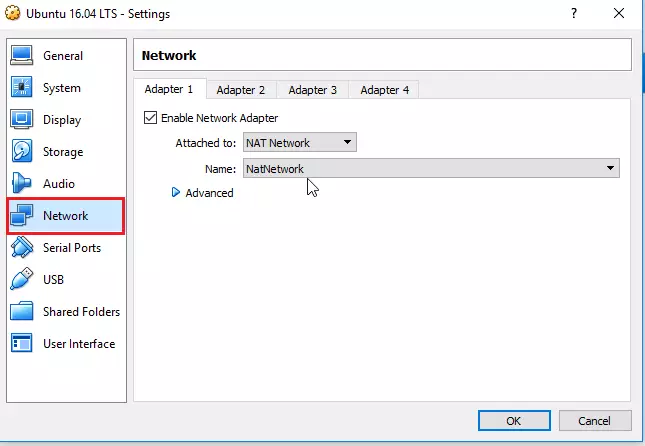
Change the Virtual Machine to use the new NAT Network
Now that the new NAT Network is created, go to each Virtual Machine and change the network settings to use the NAT Network as shown in the image below
Save the VM settings and close.
Do this to all the VMs that you want to enable inter-communication. After this change, all the VMs attached to the NAT network should be able to communicate with each other and get to the Internet.
These should probably be the default settings for VMs created on VirtualBox.
Enjoy!

Leave a Reply Cancel reply