
This guide will help you understand and change how Windows 11 asks for permission when a program needs special access. This is called the User Account Control (UAC) prompt.
What is User Account Control (UAC)?
UAC is a security feature in Windows that stops harmful programs from making changes to your computer without permission. For example, if you try to run a program that needs administrator access but you are a standard user, Windows will ask you to enter an administrator’s username and password.
Usually, standard users shouldn’t know or use administrator passwords. But there are ways to change how Windows handles these permission requests. This guide shows you how to customize that behavior.
Options for UAC Prompt Behavior for Standard Users
You can choose one of these options for what happens when a standard user tries to run a program needing admin rights:
- Automatically deny elevation requests
This means the program won’t run, and Windows will show an “Access Denied” message. This option is good if you want to keep things simple and avoid extra password prompts. - Prompt for credentials on the secure desktop
When a program needs admin rights, Windows will switch to a secure screen and ask for an admin username and password. If entered correctly, the program will run with admin rights. - Prompt for credentials (Default)
Windows will ask for an admin username and password on the normal screen. If the credentials are correct, the program runs with admin rights.
How to Change UAC Behavior Using Local Security Policy
Follow these steps to change the UAC prompt settings using the Local Security Policy Editor:
- Press Windows Key + R to open the Run box.
- Type secpol.msc and press Enter. This opens the Local Security Policy Editor.
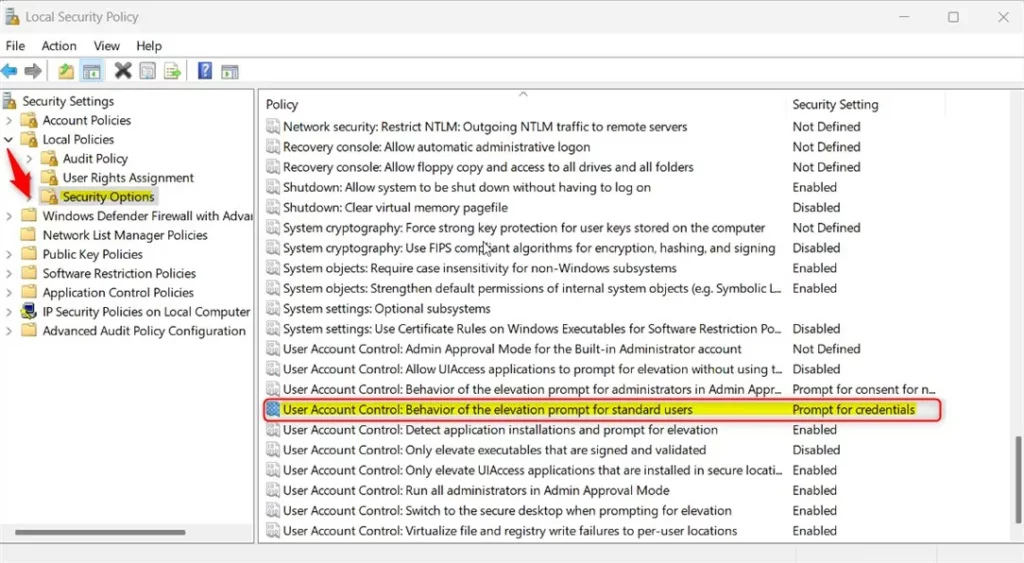
- In the left panel, expand Local Policies > Security Options.
- Find and double-click User Account Control: Behavior of the elevation prompt for standard users in the right panel.
- Choose the option you want from the dropdown:
- Automatically deny elevation requests
- Prompt for credentials on the secure desktop
- Prompt for credentials
- Click OK to save.
- Restart your computer to apply the changes.
How to Change UAC Behavior Using Registry Editor
If you cannot open the Local Security Policy Editor, you can change the setting using the Registry Editor:
- Press Windows Key + R, type regedit, and press Enter to open Registry Editor.
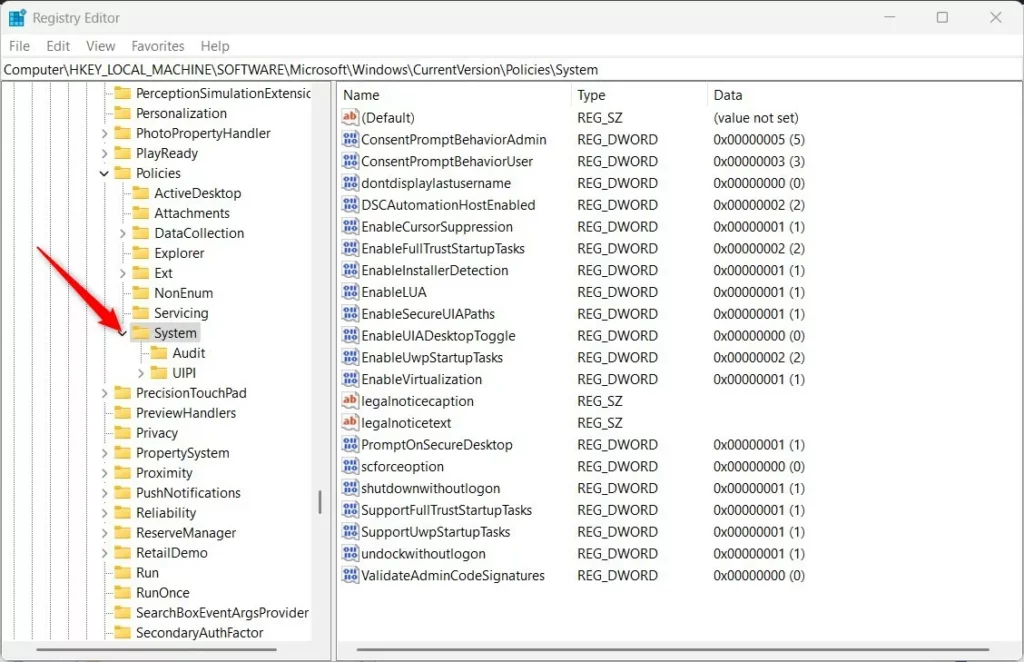
- Navigate to this folder:
HKEY_LOCAL_MACHINE\SOFTWARE\Microsoft\Windows\CurrentVersion\Policies\System
- If you don’t see the System folder, right-click on Policies, select New > Key, and name it System.
- In the System folder, right-click in the right pane and select New > DWORD (32-bit) Value.
- Name the new value: ConsentPromptBehaviorUser.
- Double-click the new value. Set the Base to Decimal and enter one of these numbers in Value data:
- 0 = Automatically deny elevation requests
- 1 = Prompt for credentials on the secure desktop
- 3 = Prompt for credentials (default)
- Click OK and close Registry Editor.
- Restart your computer to apply the changes.
Learn More
For more details, you can visit the official Microsoft page:
Microsoft UAC Behavior Settings
Summary
- Windows 11 asks for admin permission before running some programs to keep your PC safe.
- You can change how Windows asks for this permission — either deny, prompt on a secure screen, or prompt normally.
- You can make these changes through the Local Security Policy Editor or the Registry Editor.
- Remember to restart your computer after making changes for them to take effect.

Leave a Reply Cancel reply