This brief tutorial shows students and new users how to install and configure the Nagios monitoring server on Ubuntu 16.04 | 17.10 | 18.04 LTS servers.
Nagios is a powerful tool that helps monitor networks, servers, and other connected devices. By installing Nagios on Ubuntu Linux, you can centrally monitor the health of your network and quickly identify and resolve issues.
Ubuntu is a popular and stable Linux distribution widely used in server environments, making it an excellent choice for running Nagios. Additionally, Ubuntu makes it easy to install and configure Nagios with its built-in package manager and user-friendly interface.
Overall, installing Nagios on Ubuntu Linux is a straightforward process that can help you maintain the health and stability of your IT infrastructure.
For more about Nagios, please visit its homepage.
When you’re ready, continue below with the steps:
Install Apache2
Before installing Nagios server packages, ensure the Apache2 HTTP server is installed. To do that on Ubuntu, run the commands below.
sudo apt update
sudo apt install apache2
Install PHP Packages
Nagios server also requires that PHP and related modules be installed. If you don’t have these, it will automatically install them when you run the commands to install Nagios. For example, the commands below install PHP and related packages.
sudo apt install php php-cgi libapache2-mod-php php-common php-pear php-mbstring
Install Nagios Server Packages
To get Nagios on Ubuntu systems, run the commands below. The commands also include an essential plugin to monitor the Nagios server itself.
sudo apt install nagios3 nagios-plugins-basic
When you run the above command, you’ll be prompted to create a password for nagiosadmin account.
  ┌─────────────────────────────────────────────────┤ Configuring nagios3-cgi ├─────────────────────────────────────────────────┐
  │ Please provide the password to be created with the "nagiosadmin" user.                                                      │
  │                                                                                                                             │
  │ This is the username and password you will use to log in to your nagios installation after configuration is complete.  If   │
  │ you do not provide a password, you will have to configure access to nagios yourself.                                        │
  │                                                                                                                             │
  │ Nagios web administration password:                                                                                         │
  │                                                                                                                             │
  │ ___________________________________________________________________________________________________________________________ │
  │                                                                                                                             │
  │                                              <Ok>                                                                           │
  │                                                                                                                             │
  └─────────────────────────────────────────────────────────────────────────────────────────────────────────────────────────────┘
Create one and continue.
Configure Nagios Server
Once the Nagios server is installed, run the commands below to open its default configuration file.
sudo nano /etc/nagios3/nagios.cfg
Then, make the highlighted changes below and save the file.
# EXTERNAL COMMAND OPTION
# This option allows you to specify whether or not Nagios should check
# for external commands (in the command file defined below).  By default
# Nagios will *not* check for external commands, just to be on the
# cautious side.  If you want to be able to use the CGI command interface
# you will have to enable this.
# Values: 0 = disable commands, 1 = enable commands

check_external_commands=1
Next, run the commands below to open the Nagios Apache2 config file.
sudo nano /etc/nagios3/apache2.conf
Then limit access from the localhost and local subnet only.
# nagios 1.x:
#Alias /nagios /usr/share/nagios3/htdocs

<DirectoryMatch (/usr/share/nagios3/htdocs|/usr/lib/cgi-bin/nagios3|/etc/nagios3/stylesheets)>
        Options FollowSymLinks
        DirectoryIndex index.php index.html
        AllowOverride AuthConfig

   <IfVersion < 2.3>
       Order Allow,Deny
       Allow From localhost 10.0.0.0/24
   </IfVersion>
Save the file and continue below.
Next, run the commands below to adjust the Nagios folder permissions.
sudo chgrp -R www-data /var/lib/nagios3
sudo root@dlp:~# chmod 750 /var/lib/nagios3/rw
After that, restart Nagios2 and Apache2.
sudo systemctl restart nagios3.service
sudo systemctl restart apache2.service
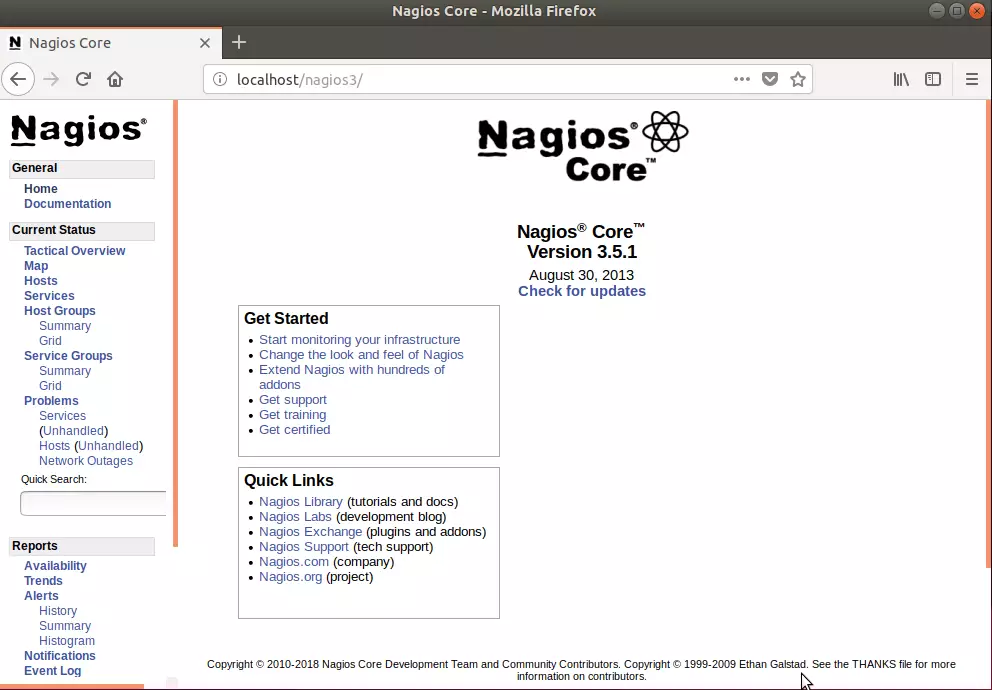
Finally, open your browser, browse the server hostname or IP address, and log on to the Nagios server.
http://localhost/nagios3
Use the username nagiosadmin and the password you created above.

That’s it!
You may also like the post below:


Leave a Reply