This article explains how to install Plone CMS on Ubuntu 24.04.
Plone CMS is an open-source content management system (CMS) built on Python. It is ideal for organizations, enterprises, and governments that require a scalable and secure platform for managing websites, intranets, and digital content.
Ubuntu’s extensive package repositories and dependency management (via apt) simplify installing Plone’s prerequisites, such as Python, build tools, and databases (PostgreSQL).
Ubuntu’s reliability, security, and alignment with Python make it a natural fit for deploying Plone CMS, particularly for organizations prioritizing ease of maintenance, compliance, and long-term scalability.
Install required packages
There are multiple ways to install Plone on Ubuntu. Using the Cookieplone template is the recommended way to install and start a new Plone project using the Volto frontend.
To get started, install these recommended packages on Ubuntu.
sudo apt update
sudo apt install zlib1g-dev libjpeg8-dev pipx make git curl build-essential python-dev-is-python3 libjpeg-dev
Install and set up NVM
Next, install the nvm package, which will be used to install Node.js.
First, create your shell profile using the command below if it does not exist.
touch ~/.bash_profile
Then, download and run the nvm install and update script and pipe it into bash.
curl -o- https://raw.githubusercontent.com/creationix/nvm/v0.39.5/install.sh | bash
Source your profile.
source ~/.bash_profile
You may have to close the terminal session and open a new one to use the nvm command.
Run the command below to verify if nvm is installed and ready to use.
nvm --version
It should output a version number of nvm.
Install Node.js
Next, install or update the supported LTS versions of Node.js, then activate the version supported in Volto.
nvm install --lts
nvm use --lts
Once Node.js is installed, you can verify its version by running the command below.
node -v
It should output the Node.js version.
Next, enable and install the latest corepack so that Node.js will install pnpm as a package manager by running the command below.
corepack enable
npm install --global corepack@latest
Generate the project
Now, you are ready to generate your Plone CMS project.
Run the command below to begin.
pipx run cookieplone project
You will be presented with a series of prompts. You can accept the default values in square brackets ([default-option]) by hitting the Enter key or enter your preferred values.
╭──────────────────────────────── cookieplone ─────────────────────────────────╮
│                                                                              │
│                               .xxxxxxxxxxxxxx.                               │
│                           ;xxxxxxxxxxxxxxxxxxxxxx;                           │
│                        ;xxxxxxxxxxxxxxxxxxxxxxxxxxxx;                        │
│                      xxxxxxxxxx              xxxxxxxxxx                      │
│                    xxxxxxxx.                    .xxxxxxxx                    │
│                   xxxxxxx      xxxxxxx:            xxxxxxx                   │
│                 :xxxxxx       xxxxxxxxxx             xxxxxx:                 │
│                :xxxxx+       xxxxxxxxxxx              +xxxxx:                │
│               .xxxxx.        :xxxxxxxxxx               .xxxxx.               │
│               xxxxx+          ;xxxxxxxx                 +xxxxx               │
│               xxxxx              +xx.                    xxxxx.              │
│              xxxxx:                      .xxxxxxxx       :xxxxx              │
│              xxxxx                      .xxxxxxxxxx       xxxxx              │
│              xxxxx                      xxxxxxxxxxx       xxxxx              │
│              xxxxx                      .xxxxxxxxxx       xxxxx              │
│              xxxxx:                      .xxxxxxxx       :xxxxx              │
│              .xxxxx              ;xx.       ...          xxxxx.              │
│               xxxxx+          :xxxxxxxx                 +xxxxx               │
│               .xxxxx.        :xxxxxxxxxx               .xxxxx.               │
│                :xxxxx+       xxxxxxxxxxx              ;xxxxx:                │
│                 :xxxxxx       xxxxxxxxxx             xxxxxx:                 │
│                   xxxxxxx      xxxxxxx;            xxxxxxx                   │
│                    xxxxxxxx.                    .xxxxxxxx                    │
│                      xxxxxxxxxx              xxxxxxxxxx                      │
│                        ;xxxxxxxxxxxxxxxxxxxxxxxxxxxx+                        │
│                           ;xxxxxxxxxxxxxxxxxxxxxx;                           │
│                               .xxxxxxxxxxxxxx.                               │
│                                                                              │
╰──────────────────────────────────────────────────────────────────────────────╯
You've downloaded /home/richard/.cookiecutters/cookieplone-templates before. Is
it okay to delete and re-download it? [y/n] (y):
╭─────────────────────────────── Plone Project ────────────────────────────────╮
│                                                                              │
│ Creating a new Plone Project                                                 │
│                                                                              │
│ Sanity check results:                                                        │
│                                                                              │
│   - Cookieplone: ✓                                                           │
│   - Python: ✓                                                                │
│   - Node: ✓                                                                  │
│   - git: ✓                                                                   │
│   - Docker (optional): Docker not found.                                     │
│                                                                              │
╰──────────────────────────────────────────────────────────────────────────────╯
  [1/17] Project Title (Project Title): Plone Project
  [2/17] Project Description (A new project using Plone 6.):
  [3/17] Project Slug (Used for repository id) (plone-project):
  [4/17] Project URL (without protocol) (plone-project.example.com): plone.example.com
  [5/17] Author (Plone Foundation):
  [6/17] Author E-mail ([email protected]): [email protected]
  [7/17] Should we use prerelease versions? (No): yes
  [8/17] Plone Version (6.1.0):
  [9/17] Volto Version (18.8.2):
  [10/17] Python Package Name (plone.project):
  [11/17] Volto Addon Name (volto-plone-project):
  [12/17] Language
    1 - English
    2 - Deutsch
    3 - Español
    4 - Português (Brasil)
    5 - Nederlands
    6 - Suomi
    Choose from [1/2/3/4/5/6] (1): 1
  [13/17] GitHub or GitLab Username or Organization (collective):
  [14/17] Container Registry
    1 - GitHub Container Registry
    2 - Docker Hub
    3 - GitLab
    Choose from [1/2/3] (1):
  [15/17] Should we setup a caching server?
    1 - Yes
    2 - No
    Choose from [1/2] (1):
  [16/17] Add Ansible playbooks?
    1 - Yes
    2 - No
    Choose from [1/2] (1):
  [17/17] Add GitHub Action to Deploy this project?
    1 - Yes
    2 - No
    Choose from [1/2] (1): 2
╭────────────────────────── Plone Project generation ──────────────────────────╮
│                                                                              │
│ Summary:                                                                     │
│                                                                              │
│   - Plone version: 6.1.0                                                     │
│   - Volto version: 18.8.2                                                    │
│   - Output folder: /home/richard/plone-project                               │
│                                                                              │
│                                                                              │
╰──────────────────────────────────────────────────────────────────────────────╯
 -> Remove GHA deployment files
 -> Initialize Git repository
 -> Setup Backend
 -> Setup Frontend
 -> Setup Cache
 -> Setup Project Settings
╭───────────────────────── New project was generated ──────────────────────────╮
│                                                                              │
│ Plone Project                                                                │
│                                                                              │
│ Now, code it, create a git repository, push to your organization.            │
│                                                                              │
│ Sorry for the convenience,                                                   │
│ The Plone Community.                                                         │
│                                                                              │
│ https://plone.org/                                                           │
╰──────────────────────────────────────────────────────────────────────────────╯
Install the project
Next, change your current working directory to plone-project.
cd plone-project
Then, run the command below to install the Plone backend and frontend.
make install
This will take a few minutes. When the process completes successfully, it will exit with no message.
After installing, run the command below to start Plone backend.
make backend-start
Next, open a new terminal session and start Plone frontend.
make frontend-start
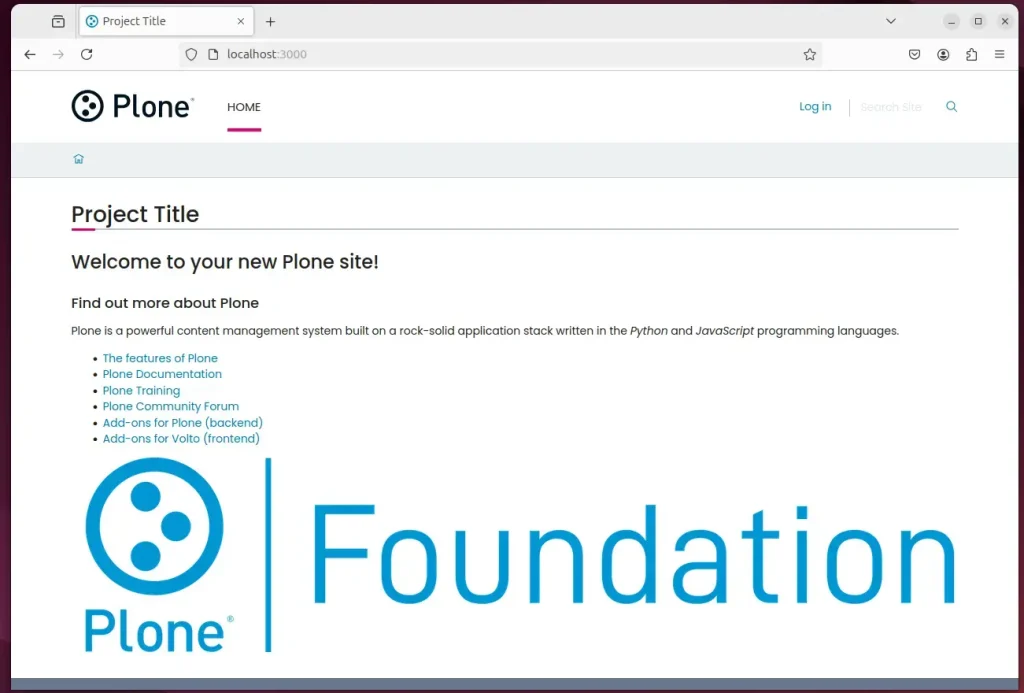
Open a browser using the following URL to visit your Plone site.
http://localhost:3000

Select the Login link to the login form, and enter the following credentials.
- Login name:
admin - Password:
admin
Now, you can edit content or configure your Plone site.
That should do it!
Reference:
Conclusion:
In conclusion, installing Plone CMS on Ubuntu 24.04 is a straightforward process that allows organizations to harness the power of an open-source content management system. Here are the key takeaways:
- Comprehensive Setup: The process includes installing necessary packages, configuring Node Version Manager (nvm), and generating the project using Cookieplone.
- User-Friendly: Plone’s interface is intuitive, making it easy to manage content and configure site settings post-installation.
- Flexible Configuration: Users can choose various options tailored to their specific needs during project generation, enhancing customization.
- Scalability: Plone is ideal for organizations looking for scalable solutions to effectively manage websites and digital content.
- Secure Environment: Ubuntu 24.04 offers a reliable and safe environment for deploying Plone, ensuring that sites comply with various organizational standards.
- Active Community: The Plone community provides continuous support and updates, making it an excellent choice for organizations seeking longevity in their CMS solution.
With these points in mind, adopting Plone for your content management needs can lead to a successful and productive web presence.


Leave a Reply