
This brief tutorial shows students and new users how to install Hestia Control Panel on Ubuntu 18.04 | 16.04.
Hestia Host Control Panel is a free, simple, and fast web host control panel that you can use to host websites, mail servers, and other web hosting features from a simple web interface.
Hestia, which also runs on low-resource servers, comes with Nginx + PHP-fpm and advanced caching available right out of the box. With its auto-installer, you can install more than 439 apps with one click.
If you need a next-generation hosting control platform built for speed, security, and stability, you may want to try the Hestia host control platform.
These features come with Hestia: WEB domains, DNS domains, MAIL domains, Databases, CRON, User Directories, and more.
For more about Hestia, please visit its homepage.
When you’re ready to install Hestia, continue with the steps below:
Configure Ubuntu Local Host Domain
Before installing Hestia, you will want to set up Ubuntu local domain on the server. To do that, run the commands below to open the Ubuntu local hosts file.
sudo nano /etc/hosts
Then type in the server address to domain mapping. You can use your public IP address instead of the local one.
127.0.0.1 hestia.example.com
It should look like the lines below:
127.0.0.1              localhost
127.0.1.1              ubuntu1804
127.0.0.1              hestia.example.com

# The following lines are desirable for IPv6 capable hosts
::1     ip6-localhost ip6-loopback
fe00::0 ip6-localnet
ff00::0 ip6-mcastprefix
ff02::1 ip6-allnodes
ff02::2 ip6-allrouters
Save the file and exit
Download the Hestia installer script
Hestia has an easy installer script to get the platform working on Ubuntu. To get the installer script, run the commands below
First, update the Ubuntu server by running the commands below: If you don’t already have wget installed, the commands below also help you install it.
sudo apt update
sudo apt install wget ca-certificates
Then use the commands below to download the script into the /tmp directory. You’ll want to use the tmp directory because its content is automatically deleted upon server reboot.
cd /tmp
wget https://raw.githubusercontent.com/hestiacp/hestiacp/release/install/hst-install.sh
Install Hestia
After downloading the script and changing the permissions above, run the commands below to begin the installation.
sudo bash hst-install.sh
When you do that, you should see a series of prompts to guide you with the installation. Choose the highlighted options below to have a smooth installation.
Welcome to the Hestia Control Panel installer!
Please wait a moment while we update your system's repositories and
install any necessary dependencies required to proceed with the installation…
(*) Installing ntpdate…
!!! !!! !!! !!! !!! !!! !!! !!! !!! !!! !!! !!! !!! !!! !!! !!! !!!
WARNING: The following packages are already installed
ufw*
It is highly recommended that you remove them before proceeding.
!!! !!! !!! !!! !!! !!! !!! !!! !!! !!! !!! !!! !!! !!! !!! !!! !!!
Would you like to remove the conflicting packages? [y/n] y
Removing conflicting packages will be done. You will then be prompted to install the listed packages on your server.
_ _ _ _ _
| | | | | |() _ / | _ \
| || |/ \/ | | |/ ` | | | |) |
| _ | /__ \ || | (| | || /
|| ||___||/__||_,|___|_|
Hestia Control Panel v1.1.1
====================================================================
The following server components will be installed on your system:
NGINX Web / Proxy Server
Apache Web Server (as backend)
PHP-FPM Application Server
Bind DNS Server
Exim Mail Server + ClamAV + SpamAssassin
Dovecot POP3/IMAP Server
MariaDB Database Server
Vsftpd FTP Server
Firewall (Iptables) + Fail2Ban Access Monitor
====================================================================
Would you like to continue with the installation? [Y/N]:Y
After that, the script should start downloading and installing your chosen packages.
Please enter admin email address: admin@example.com
Please enter FQDN hostname [ubuntu1804]: hestia.example.com
Installation backup directory: /root/hst_install_backups/hst_install-190420200849.log
When the installation is completed, you should see a screen like the one below with the administrator login details.
Congratulations!
You have successfully installed Hestia Control Panel on your server.
Ready to get started? Log in using the following credentials:
Admin URL: https://207.191.154.113:8083 Username: admin Password: c6sZectp25uvoXGE
Thank you for choosing Hestia Control Panel to power your full stack web server,
we hope that you enjoy using it as much as we do!
Please feel free to contact us at any time if you have any questions,
or if you encounter any bugs or problems:
E-mail: info@hestiacp.com
Web: https://www.hestiacp.com/
Forum: https://forum.hestiacp.com/
GitHub: https://www.github.com/hestiacp/hestiacp
Note: Automatic updates are enabled by default. If you would like to disable them,
please log in and navigate to Server > Updates to turn them off.
Help support the Hestia Contol Panel project by donating via PayPal:
https://www.hestiacp.com/donate
Sincerely yours,
The Hestia Control Panel development team
Made with love & pride by the open-source community around the world.
(!) IMPORTANT: You must logout or restart the server before continuing.
Do you want to reboot now? [Y/N] Y
When prompted, if you want to reboot now, choose Yes.
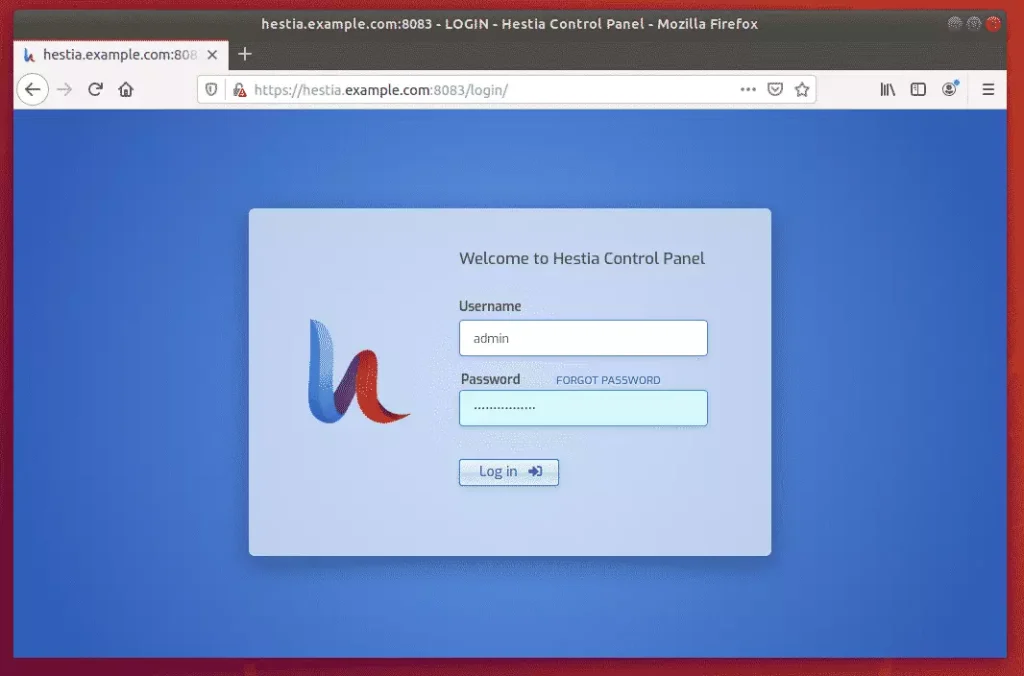
Log back into Ubuntu, then use the credentials above to sign into the Hestia host control panel using the domain name you created.
Copy the details and log on to the control panel portal.
https://hestia.example.com:8083
That should bring up the login page when you can log on with the abovementioned admin info.
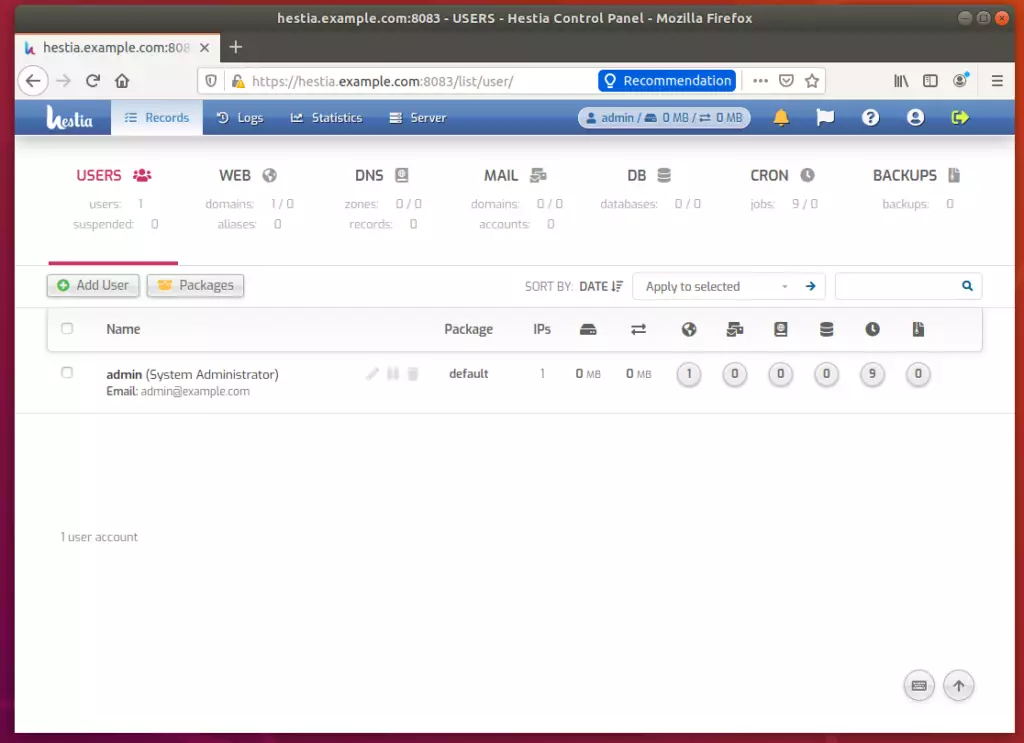
That’s it! After logging on to the back-end panel, you can set up your host environment and other settings.
Conclusion:
This post showed you how to install the Hestia web host control panel on Ubuntu 18.04 | 16.04. If you find any error above, please use the comment form below to report.
Thanks,
You may also like the post below:

Leave a Reply