
This article describes the steps to install and use Apache Hadoop on Ubuntu Linux.
Apache Hadoop is an open-source, Java-based software platform that can manage and process large datasets for applications requiring fast and scalable data processing.
It can be used across multiple distributed computing, delivering high availability in cluster environments for your applications.
There are many ways to install Apache Hadoop, and some custom installations are also available. However, for most system administrators, the method below should be the standard way to install it in their environment.
Install and use Apache Hadoop on Ubuntu Linux
As mentioned above, Apache Hadoop is an open-source, Java-based software platform that can manage and process large datasets for applications requiring fast and scalable data processing.
Below is how to install it when using Ubuntu Linux.
Install JAVA OpenJDK
Apache Hadoop is a Java-based application and, therefore, requires JDK installed. However, the open-source version of Java is excellent to use with Hadoop.
Run the commands below to install the default OpenJDK packages in Ubuntu’s repositories.
sudo apt update
sudo apt install openjdk-11-jdk
Once Java is installed, you can verify its version by running the commands below.
java -version
Additional resources on installing OpenJDK on Ubuntu Linux can be found in the post below.
How to install OpenJDK on Ubuntu Linux
Create a user account for Hadoop
As I said above, there are multiple ways to install Apache Hadoop. This article will create a dedicated user account to run Hadoop services and log on to its web interface.
The account will have a password, and you can log in to Ubuntu.
Run the commands below to create a new user called Hadoop.
sudo adduser hadoop
Complete the user details when prompted.
Adding user `hadoop' ...

Adding new group `hadoop' (1001) ...
Adding new user `hadoop' (1001) with group `hadoop' ...
Creating home directory `/home/hadoop' ...
Copying files from `/etc/skel' ...
New password:
Retype new password:
passwd: password updated successfully
Changing the user information for hadoop
Enter the new value, or press ENTER for the default
	Full Name []: Apache Hadoop
	Room Number []:
	Work Phone []:
	Home Phone []:
	Other []:
Is the information correct? [Y/n] Y
Once the user is created, switch to the newly created account by running the commands below.
su - hadoop
Type the password created when creating the user account above when prompted for a password.
Next, generate an SSH key for Hadoop and copy the key to the authorized_keys file in the user profile.
When prompted to enter a passphrase, press ENTER and leave empty for no passphrase.
ssh-keygen -t rsa
cat ~/.ssh/id_rsa.pub >> ~/.ssh/authorized_keys
chmod 640 ~/.ssh/authorized_keys
Log in to accept the SSH server’s key.
ssh localhost
Accept the key when prompted:
Are you sure you want to continue connecting (yes/no/[fingerprint])? yes
Warning: Permanently added 'localhost' (ED25519) to the list of known hosts.
Welcome to Ubuntu 22.04.1 LTS (GNU/Linux 5.15.0-50-generic x86_64)
Install Apache Hadoop
We are now ready to install Apache Hadoop. When writing this post, the latest Hadoop version is 3.3.4.
Run the commands below to download Hadoop’s current version.
cd /tmp
wget https://dlcdn.apache.org/hadoop/common/hadoop-3.3.4/hadoop-3.3.4.tar.gz
Extract the downloaded file and move it into a new Hadoop folder inside the user’s home directory.
tar xzf hadoop-3.3.4.tar.gz
mv hadoop-3.3.4 ~/hadoop
Next, run the commands below to open the bashrc file to set up Hadoop environment variables.
nano ~/.bashrc
You will have to add the variable JAVA_HOME location inside the file. However, you can quickly find the default JAVA_HOME location by running the commands below.
dirname $(dirname $(readlink -f $(which java)))
That should output a line similar to the one below.
/usr/lib/jvm/java-11-openjdk-amd64
Please copy and paste all the lines below and append them to the bashrc file. Make sure the highlighted line matches your JAVA_HOME path.
export JAVA_HOME=/usr/lib/jvm/java-11-openjdk-amd64
export HADOOP_HOME=/home/hadoop/hadoop
export HADOOP_INSTALL=$HADOOP_HOME
export HADOOP_MAPRED_HOME=$HADOOP_HOME
export HADOOP_COMMON_HOME=$HADOOP_HOME
export HADOOP_HDFS_HOME=$HADOOP_HOME
export HADOOP_YARN_HOME=$HADOOP_HOME
export HADOOP_COMMON_LIB_NATIVE_DIR=$HADOOP_HOME/lib/native
export PATH=$PATH:$HADOOP_HOME/sbin:$HADOOP_HOME/bin
export HADOOP_OPTS="-Djava.library.path=$HADOOP_HOME/lib/native"
Save the load in the new config.
source ~/.bashrc
You will also want to confirm JAVA_HOME is correct in the Hadoop-env.sh file.
nano $HADOOP_HOME/etc/hadoop/hadoop-env.sh
Under Generic settings for HADOOP, find the export JAVA_HOME line and uncomment. Then, add the JAVA_HOME path and save.
###
# Generic settings for HADOOP
Many sites configure these options outside of Hadoop,
# such as in /etc/profile.d
# The java implementation to use. By default, this environment
# variable is REQUIRED on ALL platforms except OS X!

export JAVA_HOME=/usr/lib/jvm/java-11-openjdk-amd64
Save and exit.
Configure Apache Hadoop
At this point, we’re ready to configure Hadoop to begin accepting connections. First, create two folders (namenode and datanode) inside the hdfs directory.
mkdir -p ~/hadoopdata/hdfs/{namenode,datanode}
Next, edit the core-site.xml file below.
nano $HADOOP_HOME/etc/hadoop/core-site.xml
Then, between the configuration lines, enter the hostname value to reference your system name.
See the License for the specific language governing permissions and
limitations under the License. See accompanying LICENSE file.
-->
<!-- Put site-specific property overrides in this file. -->

<configuration>
    <property>
        <name>fs.defaultFS</name>
        <value>hdfs://localhost:9000</value>
    </property>
</configuration>
Save the file and exit.
Next, edit the hdfs-site.xml file.
nano $HADOOP_HOME/etc/hadoop/hdfs-site.xml
Then, create configuration properties to reference the namenode and datanode folders created above.
See the License for the specific language governing permissions and
limitations under the License. See accompanying LICENSE file.
-->
<!-- Put site-specific property overrides in this file. -->

<configuration>
    <property>
        <name>dfs.replication</name>
        <value>1</value>
    </property>
        <name>dfs.name.dir</name>
        <value>file:///home/hadoop/hadoopdata/hdfs/namenode</value>
        <name>dfs.data.dir</name>
        <value>file:///home/hadoop/hadoopdata/hdfs/datanode</value>
</configuration>
Save and exit.
Next, edit the mapred-site.xml file.
nano $HADOOP_HOME/etc/hadoop/mapred-site.xml
Then, create configuration properties for the MapReduce framework.
See the License for the specific language governing permissions and
limitations under the License. See accompanying LICENSE file.
-->
<!-- Put site-specific property overrides in this file. -->

<configuration>
    <property>
        <name>mapreduce.framework.name</name>
        <value>yarn</value>
    </property>
</configuration>
Save and exit.
Next, edit the yarn-site.xml file.
nano $HADOOP_HOME/etc/hadoop/yarn-site.xml
Then, create configuration properties for yarn.
See the License for the specific language governing permissions and
limitations under the License. See accompanying LICENSE file.
-->
<configuration>
    <property>
        <name>yarn.nodemanager.aux-services</name>
        <value>mapreduce_shuffle</value>
    </property>
</configuration>
Save and exit.
Start and access the Apache Hadoop portal
Finally, we’re ready to start and access the Hadoop portal. But first, run the commands below to format the Hadoop namenode.
hdfs namenode -format
If successfully formatted, you should see a message in the results with the similar line below:
Storage directory /home/hadoop/hadoopdata/hdfs/namenode has been successfully formatted.
Next, run the commands below to start Hadoop.
start-all.sh
A successful start message will look like the one below:
Starting namenodes on [localhost]
Starting datanodes
Starting secondary namenodes [Ubuntu2204]
Ubuntu2204: Warning: Permanently added 'ubuntu2204' (ED25519) to the list of known hosts.
Starting resourcemanager
Starting nodemanagers
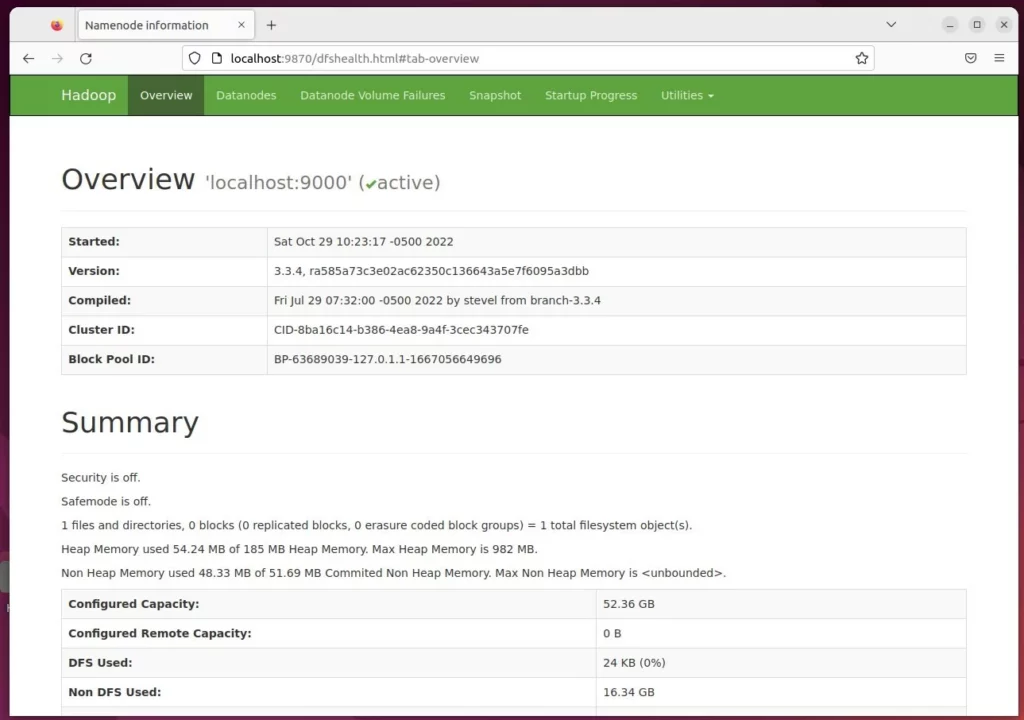
Next, open your web browser and browse to the server’s hostname or IP address, followed by port number 9870, to view the Hadoop summary portal.
http://localhost:9870
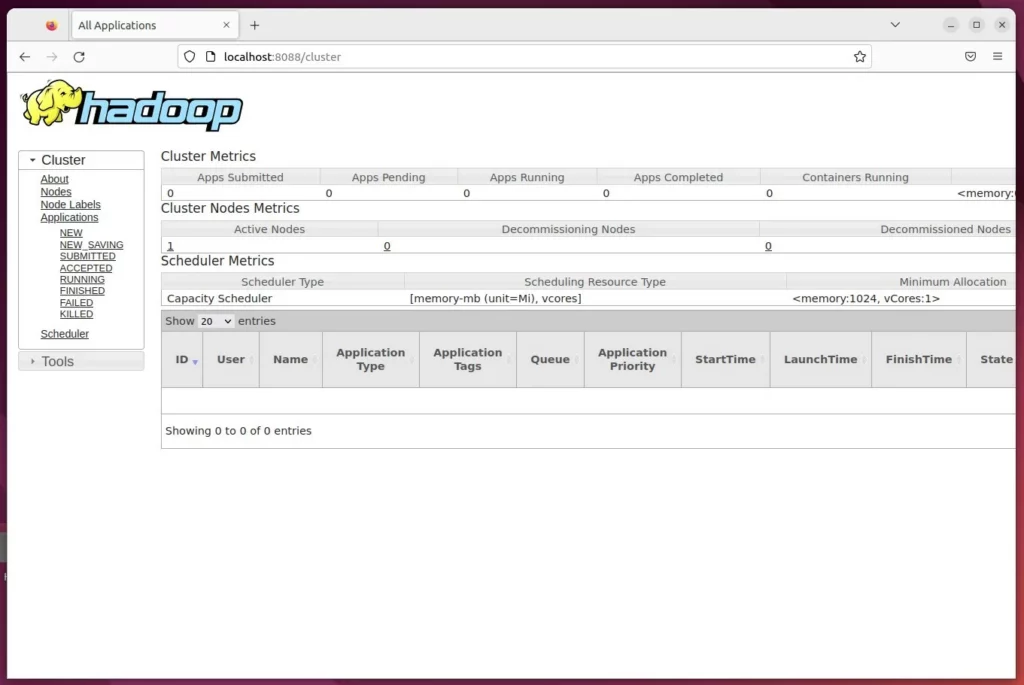
The Hadoop application portal can be accessed by going to the server’s hostname or IP address followed by port number 8088.
http://localhost:8088
That should be it!
Conclusion:
- Apache Hadoop is an open-source, Java-based software platform designed to manage and process large datasets in applications requiring fast and scalable data processing.
- The installation and setup of Apache Hadoop on Ubuntu Linux have been outlined, covering the installation of OpenJDK, user account creation, Apache Hadoop installation, environment configuration, and access to the Hadoop portal.
- Following these steps ensures system administrators can leverage Apache Hadoop across multiple distributed computing, delivering high availability in cluster environments for their applications.
- The comprehensive guide provided here aims to simplify the process for system administrators, enabling them to harness the power of Apache Hadoop for their data processing needs on Ubuntu Linux.


Leave a Reply