How to enable VirtualBox VM to VM communications

|

,

|

This tutorial educates students and new users on enabling VirtualBox virtual machine (VM) intercommunication. By default, VMs on VirtualBox cannot talk to each other or host IP while on the NAT network. For intercommunication, VMs must switch to NAT Network settings, requiring the creation of a new NAT Network interface. After making these adjustments, all…

This brief tutorial shows students and new users how to enable virtual machines created on VirtualBox to communicate with each other.

Enabling VirtualBox VM-to-VM communication is important because it allows multiple virtual machines to communicate with each other, share resources, and work together in a networked environment.

This is especially useful when working on a project with multiple VMs that need to interact with each other. Without enabling VM-to-VM communication, you may encounter issues when sharing files, accessing resources, or running applications across multiple virtual machines.

For example, right out of the box, VirtualBox’s virtual machines cannot communicate with each other while attached to the default NAT network. VMs configured with the default NAT network can only access the Internet without VM-to-VM or Host IP communication.

To allow virtual machines to communicate with each other, you must change the VM network settings to use NAT Network, but you can’t use that Network setting if you haven’t already created it.

Below is the Network table for VMs. As you can see, VMs with NAT network settings cannot talk to the Host or other VMs but can’t get to the Internet.

VMs with NAT Network settings cannot talk to the Host computer but can communicate with other VMs and can’t go to the Internet.

VM ↔ HostVM1 ↔ VM2VM → InternetVM ← Internet
Host-only++
Internal+
Bridged++++
NAT+Port forwarding
NAT Network++Port forwarding

To allow VMs to communicate with each other, attach the VMs to the NAT Network settings. Continue below to learn how to do that.

Create VirtualBox NAT Network

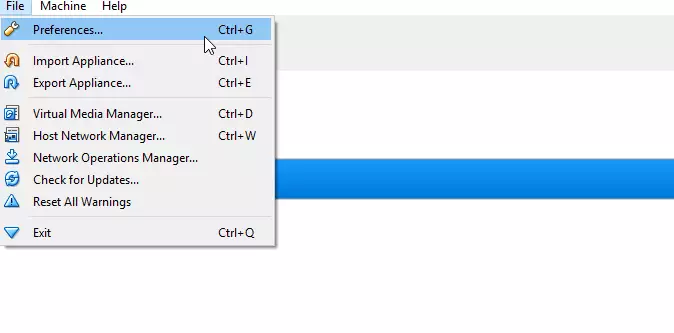
Before using NAT Network settings for VM, you must create a NAT Network interface. To do that, open VirtualBox software and click File ==> Preferences.

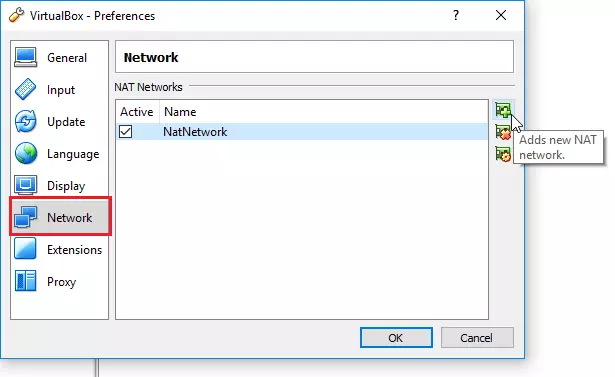
On the Preferences page, go to Network and click Add to create a new NAT Network.

Change the Virtual Machine to use the new NAT Network

Now that the new NAT Network is created go to each Virtual Machine and change the network settings to use the NAT Network as shown in the image below

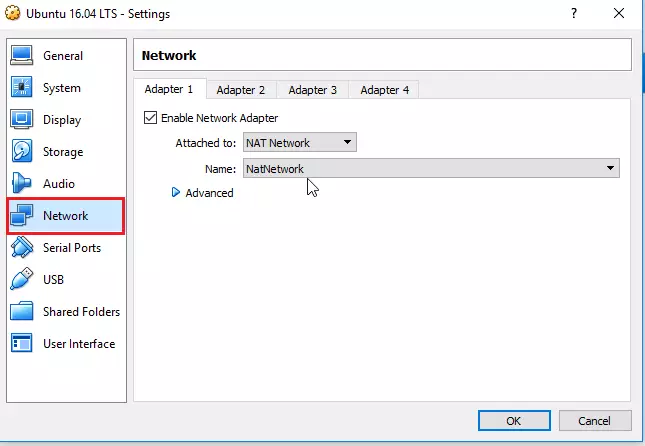
Save the VM settings and close.

Do this to all the VMs that you want to enable inter-communication. After this change, all the VMs attached to the NAT network should be able to communicate with each other and get to the Internet.

These should probably be the default settings for VMs created on VirtualBox.

Enjoy!

Like this:


8 responses to “How to enable VirtualBox VM to VM communications”

  1. Mo Avatar
    Mo

    Thanks mate! Out of 10’s unhelpful articles and stackoverflow threads, this was the only one the addressed the problem clearly and had a working solution. Good job!

  2. SM Avatar
    SM

    Very well and precise documented. I spent hours and hours making two VM talking in vBox. I did a clean install and did this in two minutes and voila.

    However, I think this should be as:

    From:

    Below is the Network table for VMs.. as you can see VMs with NAT network settings can not talk to the Host, or other VMs, but can’t get to the Internet…
    VMs with NAT Network settings can not talk to the Host computer, but can communicate with other VMs and can’t go to the Internet..

    To:

    Below is the Network table for VMs.. as you can see VMs with NAT settings can not talk to the Host, or other VMs, but can get to the Internet…
    VMs with NAT Network settings can not talk to the Host computer, but can communicate with other VMs and can go to the Internet…

    Thanks!

  3. zayan Avatar
    zayan

    Hello,

    Thanks for the valuable article. I followed this tutorial but I can not able to connect to the VM from my Host machine. How we can enable this?

    1. Elwyn Avatar
      Elwyn

      I think this article is good but needs more clarification.

      With the “NAT Network” setting, the port forwarding option is disabled. So how do I know which port to try to connect to? (I am assuming it still uses the same host 127.0.0.1.)

      With the “NAT” setting, I can set port forwarding so specific ports are used. eg port 2222 for SSH and thus from the host, I can connect to the VM using 127.0.0.1:2222

      When logged into the VM, I can go to the File manager -> Other Locations and see “Computer” and “Windows Network” but not the other VM.

  4. Arshak Avatar
    Arshak

    Hello,

    Thanks for the superb article. I followed this but I can not able to connect with VM from my host machine. How can I enable it?

  5. vijay rawat Avatar
    vijay rawat

    awesome …table on network slove my problem of a week in a second

  6. usdhak Avatar
    usdhak

    Hi I am new to this forum, please help on this Oracle virtualbox network connection problem

    I have created 3 NAT networks,
    ENT network- 192.168.10.0/24
    Client network – 172.168.10.0/24
    Tech network – 10.10.10.0/24

    And I configured DC in a VM in ENT network, and I am able to add other VM’s from ENT network to the domain

    But iam not able to add VM’s from other networks (Client & Tech) in the domain

    Infact not able to ping/connect VM’s between different NAT networks

  7. Manish Chourasia Avatar
    Manish Chourasia

    HI
    I have added the same but did not worked for me , my ubutu has assigned 192.168.1.7 and windows having 192.168.1.8 IP address but ubutu to windows ping is not working but viseversa has worked

Leave a Reply to SM Cancel reply

Your email address will not be published. Required fields are marked *

This site uses Akismet to reduce spam. Learn how your comment data is processed.