How to Use WiFi AutoSwitch in Windows 11

Wi-Fi AutoSwitch in Windows 11 is a built-in setting that makes your PC switch to a better wireless network automatically based on signal strength. When you move around your home or office, this tool helps your computer drop a weak connection and grab a stronger one without making you click anything.
Turning on AutoSwitch keeps your internet fast when you walk closer to a different router. Turning it off stops Windows from jumping to another network when you want to stay on your current one.
Enable or disable WiFi autoSwitch in Windows 11 by checking or unchecking “Look for other wireless networks while connected to this network” in your WiFi’s Wireless Properties. You can also manage this via Command Prompt by setting the autoswitch parameter to Yes or No.
Method 1Change Wi-Fi AutoSwitch Using Settings
You can manage your wifi autoSwitch Windows 11 settings directly through the main Settings app to control how your computer jumps between wireless networks. This built-in option helps your laptop drop weak signals and latch onto stronger routers nearby without manual disconnects. Open the Settings app by pressing the Win plus I on your keyboard to get started.
- Open Settings. Press the Win+I on your keyboard.
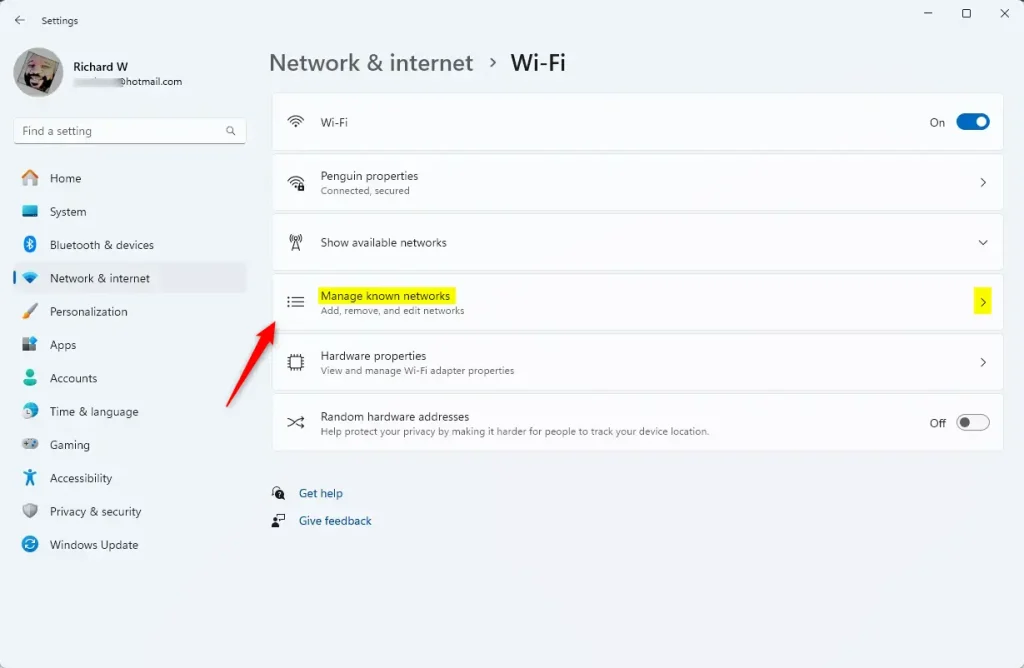
- Go to Network & internet. In the Settings window, click Network & internet on the left side. Then, on the right side, click Wi-Fi .
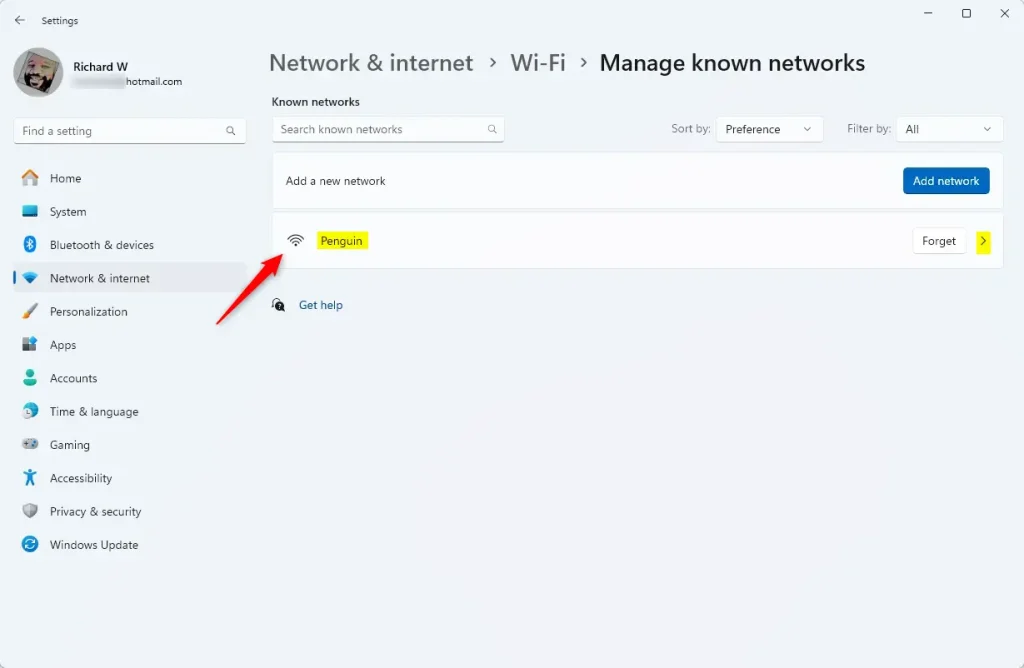
- Find your known networks. Scroll down and click Manage known networks. This shows all the Wi-Fi networks your PC remembers.
- Select the network. Click the name of the Wi-Fi network you want to adjust.
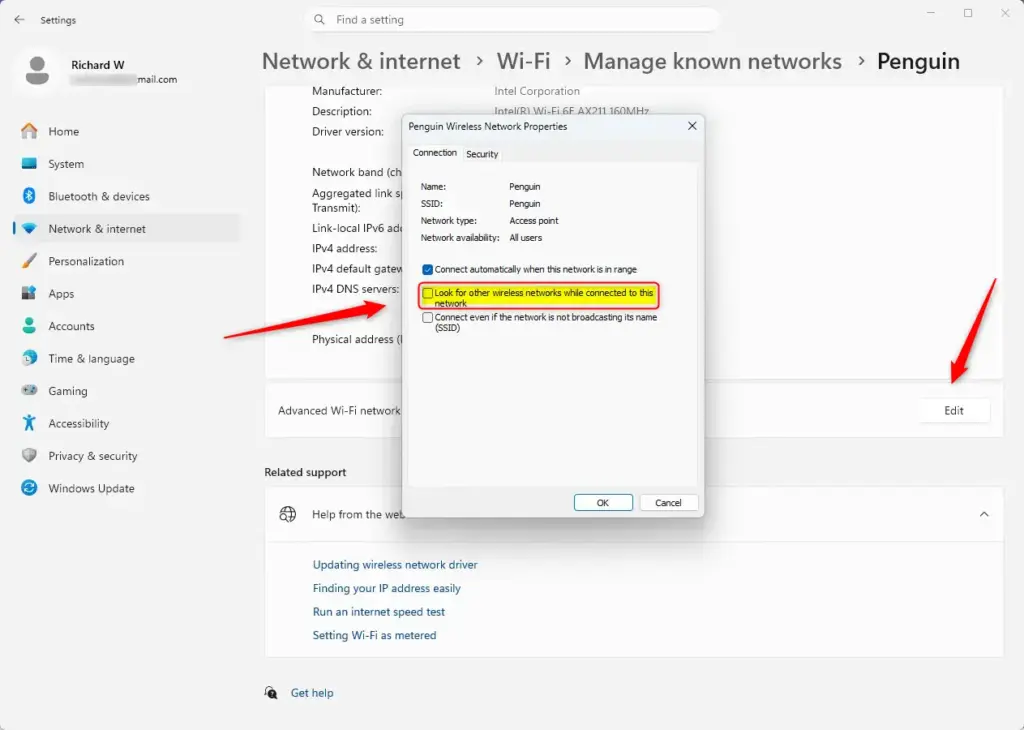
- Open advanced settings. Click the Edit button. This opens the advanced settings for that Wi-Fi connection.
- Control the autoSwitch setting. You will see a box labeled Look for other wireless networks while connected to this network.
- To turn on autoSwitch: Check this box. Your PC will look for and potentially switch to other preferred Wi-Fi networks.
- To turn off autoSwitch: Uncheck this box. Your PC will try to stay connected to the current network.
📝Good to KnowThe 'Connect automatically' option must be on for a network before you can change its autoSwitch setting.If the 'Connect automatically when this network is in range' box appears grayed out, it signifies that this option is currently off for that specific network.
- To turn on autoSwitch: Check this box. Your PC will look for and potentially switch to other preferred Wi-Fi networks.
- Save your changes. Click OK.
- Close Settings. You can now close the Settings app.
Method 2Adjust AutoSwitch Using Network and Sharing Center
You can use the classic Network and Sharing Center to adjust your wifi autoSwitch Windows 11 properties through the familiar Control Panel interface. This older menu gives you direct access to your adapter properties so you can tweak how your wireless card handles roaming between access points. Search for the Control Panel in your Start menu to begin changing these adapter settings.
- Open Network and Sharing Center. Search for ‘Control Panel ’ and open it. Make sure your view is set to ‘Large icons’ or ‘Small icons’ (not ‘Category’), then click Network and Sharing Center.
- Click your Wi-Fi connection. Under ‘Connections:’, click the name of the Wi-Fi network you are connected to. It will be a link.
- Open Wireless Properties. In the ‘Wi-Fi Status’ window, click Wireless Properties.
- Set up the autoSwitch setting. In the ‘Wireless Network Properties’ window, find the box labeled Look for other wireless networks while connected to this network.
- To turn on autoSwitch: Check this box. Your PC will look for other available Wi-Fi networks.
- To turn off autoSwitch: Uncheck this box. Your PC will be less likely to switch away from your current connection.
The autoSwitch option will be grayed out if the "Connect automatically when this network is in range" setting is not turned on for a specific Wi-Fi network. You must turn on the "Connect automatically when this network is in range" setting first if you want to change the autoSwitch setting for that network.
- To turn on autoSwitch: Check this box. Your PC will look for other available Wi-Fi networks.
- Apply your choice. Click OK.
- Close Network and Sharing Center. Click Close in the Wi-Fi Status window, and then close the Network and Sharing Center.
Method 3Fine-Tune AutoSwitch Using Command Prompt (Windows Terminal)
You can fine-tune your wifi autoSwitch Windows 11 configuration using text commands inside Windows Terminal when the graphical menus do not give you enough control. This command-line method lets you view exact network profiles and force your wireless adapter to prioritize specific access points. Open Windows Terminal from your Start menu to run network commands directly.
- Open Windows Terminal. Search for 'Windows Terminal' in the Start menu and open it. You can select 'Windows PowerShell' or 'Command Prompt' from the menu.
- List your Wi-Fi profiles. Type the following command and press Enter:
netsh wlan show profilesThis command shows all the Wi-Fi networks your PC has saved.
- Find the network name. Look for the exact name (SSID) of the Wi-Fi network you want to change. Make sure to type it correctly, as commands are case-sensitive.
- Change the autoSwitch setting. Use one of the following commands. Replace
[Network Name]with the actual name of your Wi-Fi network.- To turn on autoSwitch: Use this command:
netsh wlan set profileparameter name="YourNetworkName" connectionmode=auto autoswitch=YesThis command tells Windows to connect automatically and look for other preferred networks.
- To turn off autoSwitch: Use this command:
This command turns off autoSwitch, making your PC more likely to stay on the current network.netsh wlan set profileparameter name="YourNetworkName" autoswitch=No
💡TipTo make sure the network is set to connect automatically, you can add /allowIntegratedHotspot = true to the command.To make sure the network is set to connect automatically, you can add
/allowIntegratedHotspot = trueto the command. For example, to turn off autoSwitch but keep auto-connect on:netsh wlan set profileparameter name="YourNetworkName" connectionmode=auto autoswitch=No
- To turn on autoSwitch: Use this command:
- Press Enter after typing your command.
- Close Windows Terminal. Once the command runs, you can close the window.
Summary
You can manage wifi autoSwitch Windows 11 features using the Settings app, the Control Panel, or Windows Terminal depending on your preference. Turning this setting on lets your PC jump to stronger signals by itself, while turning it off keeps you locked to your current router. Check your known network properties to make sure your computer connects automatically to your preferred wireless access points.




No comments yet — be the first to share your thoughts!