Remove Input Language Keyboard in Windows 11: Step-by-Step Guide

Removing an unwanted input language keyboard in Windows 11 stops accidental language switching by deleting extra keyboard layouts from your taskbar . An input language keyboard is the system map Windows uses to match your physical key presses to the letters and symbols of a specific language on your screen.
Extra layouts often appear by accident during PC setup or after you download a language pack. You may notice them when the language indicator appears in the taskbar , or when typing suddenly produces the wrong characters after you press Win+Space or Left Alt + Shift. Cleaning up the unused options gives you a faster way to switch between languages without hitting the wrong keys while you type.
To remove a keyboard layout in Windows 11, open Settings , go to Time & language Language & region, then click the three dots on the language tile and select Options. Under Keyboards, click the three dots beside the layout, select Remove, and it disappears from the taskbar switcher. If Remove is greyed out, add another layout first.
How to uninstall the input language keyboard in 🪟 Windows 11
To remove a keyboard layout you no longer need, open the Time & language settings, go to Language & region, open the options for the language, and remove the layout from its Keyboards list. You can do this on both Windows 11 Home and Pro, and you don’t need a restart. The layout disappears from the taskbar switcher straight away.
If the layout you want to delete is the only one on your system, add a replacement first, then remove the old one. If the Remove option is greyed out or missing, this is the most likely reason.
These related guides cover adding, changing and overriding keyboard layouts and input methods:
- How to add an input language keyboard in Windows 11
- How to change input language keyboard layouts in Windows 11
- How to override input language default methods in Windows 11
Follow the steps below to remove an input language keyboard. You need no special permissions for this, because the setting applies to your own account.
- Click the Start button, then open Settings.
- Go to Time & language Language & region
The layout of the page is the same, and you should now see a list of your installed languages.
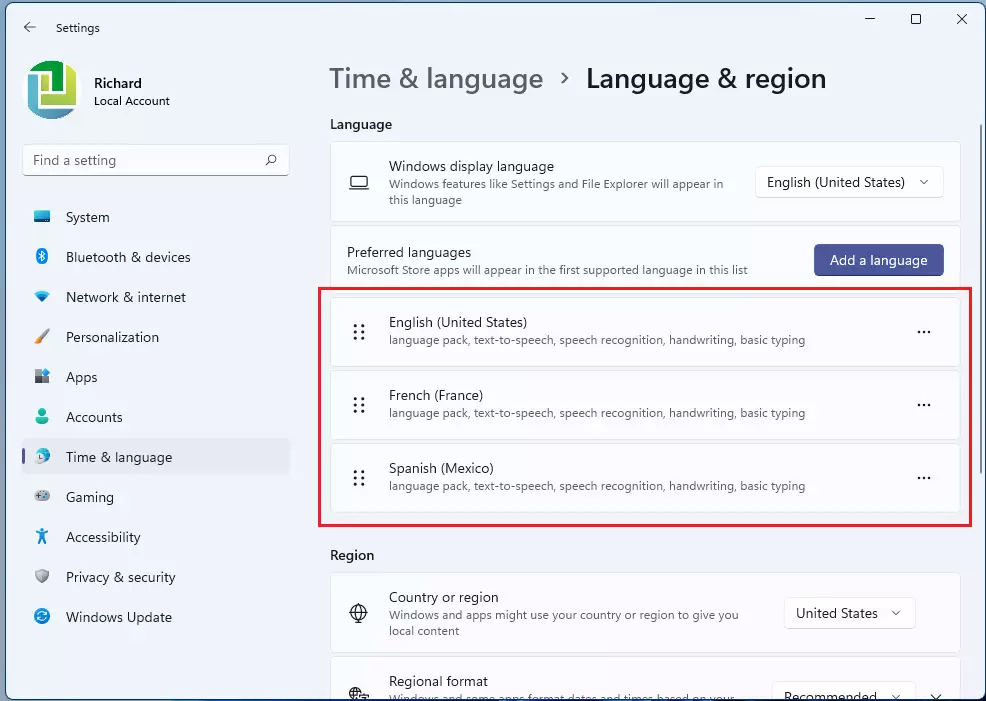
- On the Language & region settings pane, under Language, find the language tile that contains the layout you want gone.
- Click the three dots icon on that tile, then select Options.
A page opens for that language. It shows its language pack features and a Keyboards section lower down.

- Scroll down to the Keyboards section.
- Click the three dots beside the specific layout you want to delete.
- Select the Remove button to complete the removal.
The layout vanishes from the list right away. If it was the only keyboard left and the button is greyed out, add another layout first and then repeat these steps.

Your keyboard list is now clean and only contains the layouts you actually use. To check, click the language indicator in the taskbar, or press Windows key + Space, and confirm that only the layouts you want are listed. If you remove a layout by mistake, you can add it back from the same Keyboards section.
Here is a quick summary:
- Manage Multiple Layouts: Windows 11 supports various input language keyboards, allowing users to switch between them as needed.
- Access Settings Easily: To remove a keyboard layout, navigate to Settings Time & language Language & region (called Preferred languages on some older builds).
- Simple Steps: Select the preferred language, open its options, and use the remove function to delete unwanted layouts.
- Useful Resources: For further assistance, refer to articles on adding and changing keyboard layouts or overriding input methods.
- Customization of User Experience: Adjusting keyboard settings improves the typing experience according to individual language preferences.
Was this guide helpful?
0% of readers found this helpful (1 votes)

About the Author
Richard
Tech Writer, IT Professional
Richard is a writer at Geek Rewind who turns complex IT tasks into clear, step-by-step guides. He draws on years of hands-on experience in system administration and enterprise IT operations, focusing on Windows, Linux and WordPress: the problems people actually run into, and the fixes that work. His server and WordPress guides come from systems he runs himself. Richard builds and maintains the platform behind Geek Rewind, from its Ubuntu servers and Nginx configuration to its custom WordPress plugins. Many new tutorials start with readers' questions, and he's always glad to answer them in the comments.



No comments yet — be the first to share your thoughts!