
This post shows students and new users steps to revert to Windows 10 after upgrading to Windows 11.
When you perform a place upgrade to Windows 11, you can go back to Windows 10 within 10 days after the upgrade without losing your files.
Users might want to roll back the Windows 11 upgrade because of incompatible system drivers, performance issues, and lack of user support. Whatever your reasons for rolling back Windows 11, this option is only available for 10 days after you upgrade your computer.
After 10 days, Windows 11 will delete all the previous installation files to make room for Windows 11 updates and other upgrades. You’ll not be able to restore Windows 10 after the 10 days have passed.
After the days have passed, you’ll get a message that “this option is no longer available on this PC” when you click the Go Back button.
Although you may be able to restore Windows 10 after upgrading, you may have to reinstall some applications and settings because, during the upgrade process, Windows may have changed them a bit, which may require users to redo some of the changes.
How to revert to Windows 10 after upgrading to Windows 11
As mentioned above, one has 10 days to return to Windows 10 after upgrading to Windows 11. Below is how to do that.
Windows 11 has a centralized location for the majority of its settings. Everything can be done, from system configurations to creating new users and updating Windows from its System Settings pane.
To get to System Settings, you can use the Windows key + I shortcut or click on Start ==> Settings, as shown in the image below:

Alternatively, you can use the search box on the taskbar and search for Settings. Then select to open it.
Windows Settings pane should look similar to the image below. In Windows Settings, click System, and select the Recovery tile on the right pane of your screen, as shown in the image below.

On the System Recovery settings pane, Under the Recovery options, click the Go back button.

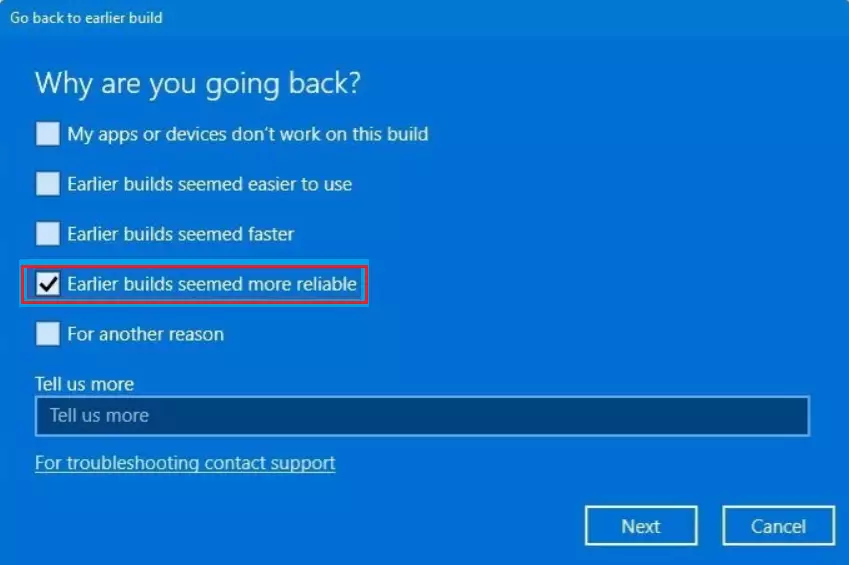
When you do that, Windows will initiate the restoration process and prompt you to choose why you wish to return. The most common reason is that the Earlier builds seemed more reliable. Click Next after your selection.
On the next page, when prompted to check for Updates, choose No, thanks.
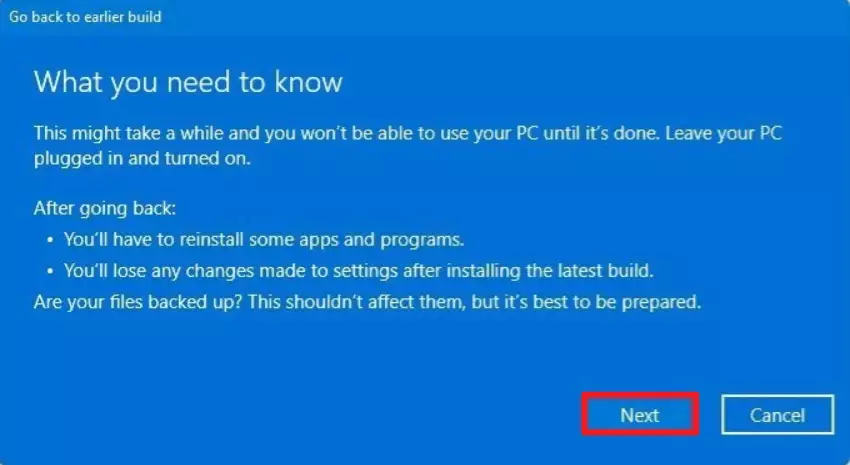
Then click Next after you’ve read some changes you’ll have to perform after reverting to Windows 10.
- You will have to reinstall some apps and programs.
- You will lose any changes made to settings after installing the latest build.
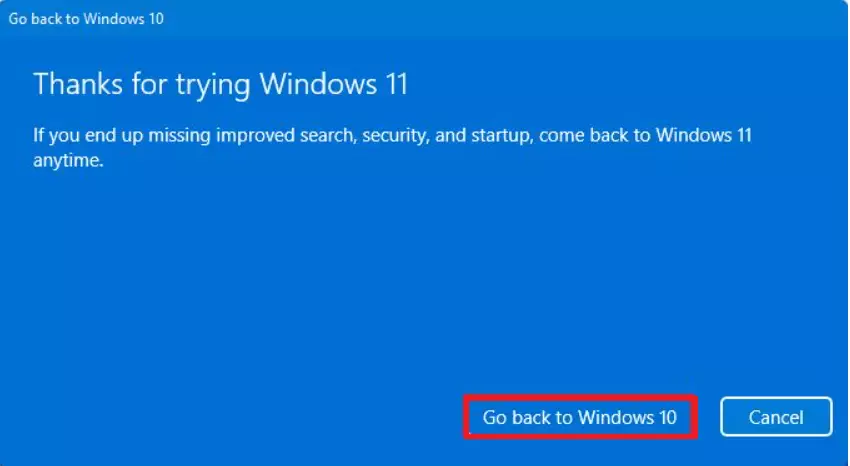
Finally, click the Go back to Windows 10 button to revert to the Windows 11 upgrade.
That should do it!
After that, Windows will revert to Windows 10 without losing your files and many settings. You will still be able to upgrade at any time when you decide to.
Conclusion:
- Reverting to Windows 10 after upgrading to Windows 11 is possible within 10 days without losing files.
- Users may choose to roll back due to performance issues, driver incompatibilities, or personal preference.
- The rollback process involves a few straightforward steps in the System Settings.
- Important considerations post-rollback include:
- Reinstallation of some applications may be necessary.
- Changes made to settings after the upgrade will be lost.
- After the 10-day window, the option to revert will no longer be available.
- Users can always choose to upgrade to Windows 11 again if desired.
Leave a Reply