
This article explains how to generate and manage GPG keys on Ubuntu Linux.
Using GPG encryption to encrypt your data before transfer ensures that they will not be viewed or read by anyone without a valid matching key pair. This technology works across diverse platforms, including Windows, Mac OS, and Linux.
Understanding how to create and manage GPG keys on Ubuntu Linux is crucial for anyone looking to protect the security and privacy of their data. GPG encryption allows for the encryption of files and communications, ensuring that only those with the appropriate key pair can access the data.
This can be especially important for businesses or individuals who must protect sensitive information from unauthorized access.
Users can ensure their data is secure and protected from prying eyes by learning how to generate and manage GPG keys on Ubuntu Linux.
How to install GnuPG
To use GPG encryption, you need to install software that generates and manages your GPG keys.
On Linux systems, a popular tool to help with GPG is GnuPG.
GnuPG is a free software implementation of the OpenPGP standard that enables you to encrypt and sign your data and communications using GPG encryption.
Launch the command line terminal on Ubuntu and execute the following commands to install GnuPG.
sudo apt update
sudo apt install gnupg
After installing GnuPG, execute the commands below to verify its installation and which encryption algorithms are supported.
gpg --help

Output:
gpg --help
gpg (GnuPG) 2.2.4
libgcrypt 1.8.1
Copyright (C) 2017 Free Software Foundation, Inc.
License GPLv3+: GNU GPL version 3 or later <https://gnu.org/licenses/gpl.html>
This is free software: you are free to change and redistribute it.
There is NO WARRANTY, to the extent permitted by law.

Home: /home/richard/.gnupg
Supported algorithms:
Pubkey: RSA, ELG, DSA, ECDH, ECDSA, EDDSA
Cipher: IDEA, 3DES, CAST5, BLOWFISH, AES, AES192, AES256, TWOFISH,
CAMELLIA128, CAMELLIA192, CAMELLIA256
Hash: SHA1, RIPEMD160, SHA256, SHA384, SHA512, SHA224
Compression: Uncompressed, ZIP, ZLIB, BZIP2

Syntax: gpg [options] [files]
Sign, check, encrypt or decrypt
Default operation depends on the input data
How to generate your GPG key pair
Now that GnuPG is installed, you’ll need to generate your own GPG key pair, consisting of a private and public key.
The private key acts as your master key, allowing you to decrypt or encrypt your files and create signatures using it.
The public key is shared with those who need to access and view the content encrypted with your private key. It also confirms that the content encrypted with your private key originates from you.
To generate your key pair, run the commands below:
gpg --gen-key
To initiate the GPG key generation process, you will be asked to provide your real name and email address to identify the key. You should see output similar to the following:
gpg --gen-key
gpg (GnuPG) 2.2.4; Copyright (C) 2017 Free Software Foundation, Inc.
This is free software: you are free to change and redistribute it.
There is NO WARRANTY, to the extent permitted by law.

Note: Use "gpg --full-generate-key" for a full featured key generation dialog.

GnuPG needs to construct a user ID to identify your key.

Real name: Richard
Email address: [email protected]
You selected this USER-ID:
    "Richard <[email protected]>"

Change (N)ame, (E)mail, or (O)kay/(Q)uit? O
We need to generate a lot of random bytes. It is a good idea to perform
some other action (type on the keyboard, move the mouse, utilize the
disks) during the prime generation; this gives the random number
gpg: revocation certificate stored as '/home/richard/.gnupg/openpgp-revocs.d/77B56FA102AECAC136D1C361F6A785CA937400D3.rev'
public and secret key created and signed.

pub   rsa3072 2019-07-01 [SC] [expires: 2021-06-30]
      77B56FA102AECAC136D1C361F6A785CA937400D3
uid                      Richard <[email protected]>
sub   rsa3072 2019-07-01 [E] [expires: 2021-06-30]
You’ll be prompted to type and confirm your passphrase for the private key.
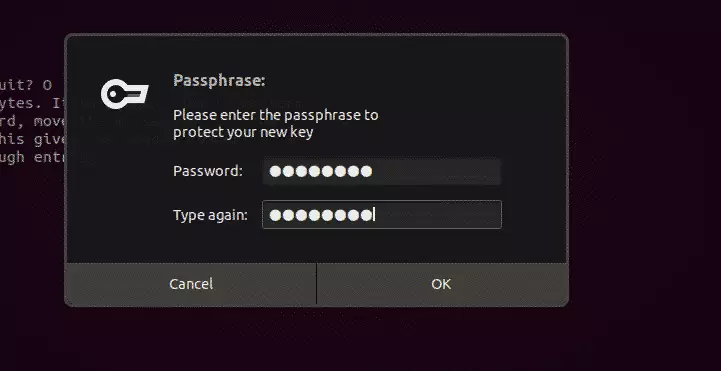
After that, your key pair should be generated.
How to export your public key
You can run the following commands to export and share your public key with others. The public key is used to verify that the content you encrypted originated from you.
It is also used to decrypt the content you encrypted.
gpg --armor --export [email protected] > public_key.asc
You can also use the commands below to export the key into a readable text file.
gpg --armor --output key.txt --export [email protected]
You can then send the public key file to those who should get it.
How to encrypt and decrypt files
To encrypt a file you want to secure, you run the commands below. The public. text file becomes confidential.text.enc protected file.
gpg --encrypt --recipient '[email protected]' --output confidential.txt.enc public.txt
You should see the output below:
Output
gpg: checking the trustdb
gpg: marginals needed: 3  completes needed: 1  trust model: pgp
gpg: depth: 0  valid:   1  signed:   0  trust: 0-, 0q, 0n, 0m, 0f, 1u
gpg: next trustdb check due at 2021-06-30
You can now delete the public.txt file and only have the encrypted version.
Decrypting Files
To decrypt the confidential.txt.enc file using the public key. Run the commands below:
gpg --decrypt --output public.txt confidential.txt.enc
You will need to provide your passphrase to access your private key for decrypting the file.
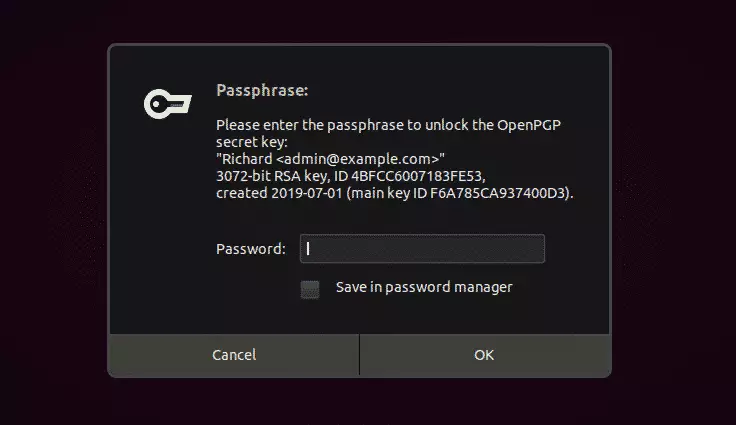
Enter the key to decrypt.
Output
gpg: encrypted with 3072-bit RSA key, ID 4BFCC6007183FE53, created 2019-07-01
"Richard <[email protected]>"
The confidential.txt.enc file becomes public.txt.
Windows users can use Gpg4win instead.
That should do it!
Conclusion:
In summary, mastering GPG key management on Ubuntu Linux is essential for securing sensitive data. Here are the key takeaways:
- GPG encryption protects your data by requiring a valid key pair for access.
- Installing GnuPG is the first step in leveraging GPG encryption on Ubuntu.
- Generating a GPG key pair includes creating both a public and private key.
- Your public key can be shared with others to allow them to send you secure messages.
- Encrypting files safeguards their content, making them unreadable without the corresponding private key.
- Decrypting files requires providing the passphrase associated with your private key.
- Understanding and utilizing GPG keys can significantly enhance your data security and privacy.
Leave a Reply