
This article explains how to fix standard printer connections and print problems using Windows 11.
If you’re trying to use your Printer and run into issues, below are some steps to get things working again. Before continuing below, please turn off your Printer and unplug it, wait 30 seconds, plug it back in, and then turn it back on.
If doing the above doesn’t fix the printer connection or printing issues, continue below to try additional steps.
If your Printer is connected to your computer using a wire, make sure that the Printer’s USB cable is correctly connected from the Printer to your PC. Also, ensure the Printer’s wireless option is turned on and available for wireless-connected printers.
If the wireless printer option is enabled and turned on, connect the Printer to your computer’s Wi-Fi network. If your Printer is not connected, you
If you have multiple printers in Windows, you may have a default printer that is the one you think you’re printing to. Read the post below to learn how to configure a default printer in Windows 11.
How to set your default printer in Windows 11
How to fix printer connection and printing issues in Windows 11
As mentioned above, if you’re trying to use your Printer and run into problems, below are some steps to get things working again.
After checking the steps above and if you still have issues connecting and printing to your Printer, follow the steps below.
Remove or delete your Printer.
If you check all of the above and are still not able to print, follow these steps:
In most cases, removing and reinstalling the Printer may help. In Windows 11, go to the Start button, then select Settings > Devices > Printers & scanners.
Under Printers & scanners, find the Printer, select it, and then select Remove Device. The post below shows you how to remove and delete a printer driver in Windows 11.
How to remove or delete a printer in Windows 11
Reinstall your Printer
Once the Printer is removed or deleted, go and reinstall it. You must follow different steps to reinstall or add a wireless or local printer.
Select the Start button, then Settings > Devices > Printers & scanners. Finally, select Add a printer or scanner.
Wait for your Device to find nearby printers, choose the one you want, and then select Add Device.
If your Printer is turned on and connected to the network, Windows should find it easily. Available printers can include all printers on a network, such as Bluetooth and wireless printers, or printers plugged into another computer and shared on the network.
Below are helpful posts that show you how to install printers in Windows 11
- How to install a printer in Windows 11
- How to install a wireless printer in Windows 11
- How to install a printer’s latest driver
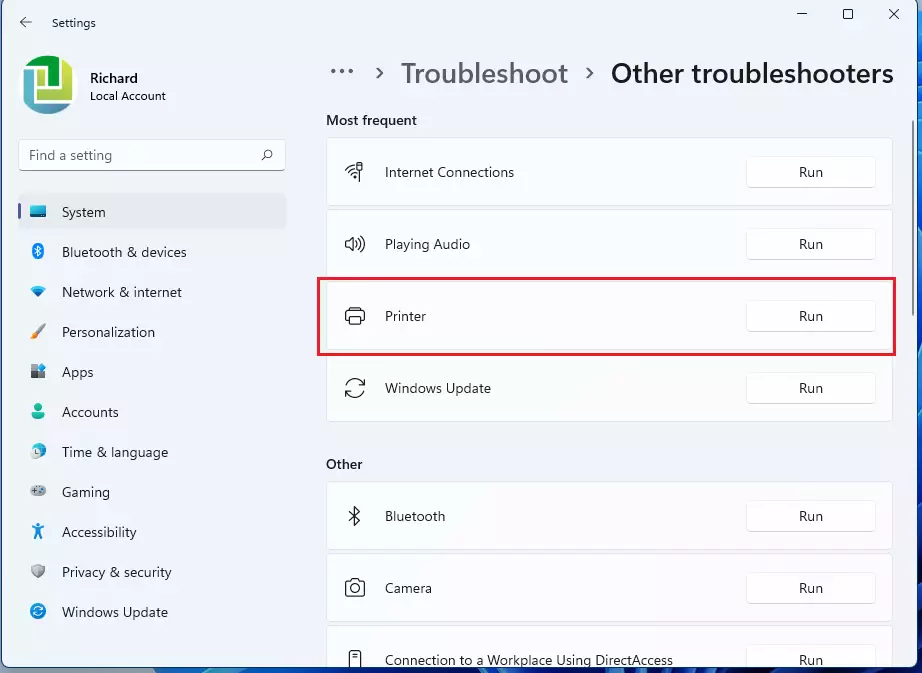
Run the Printer Troubleshooter
If you still can’t get print after the steps above, run the Printer troubleshooter.
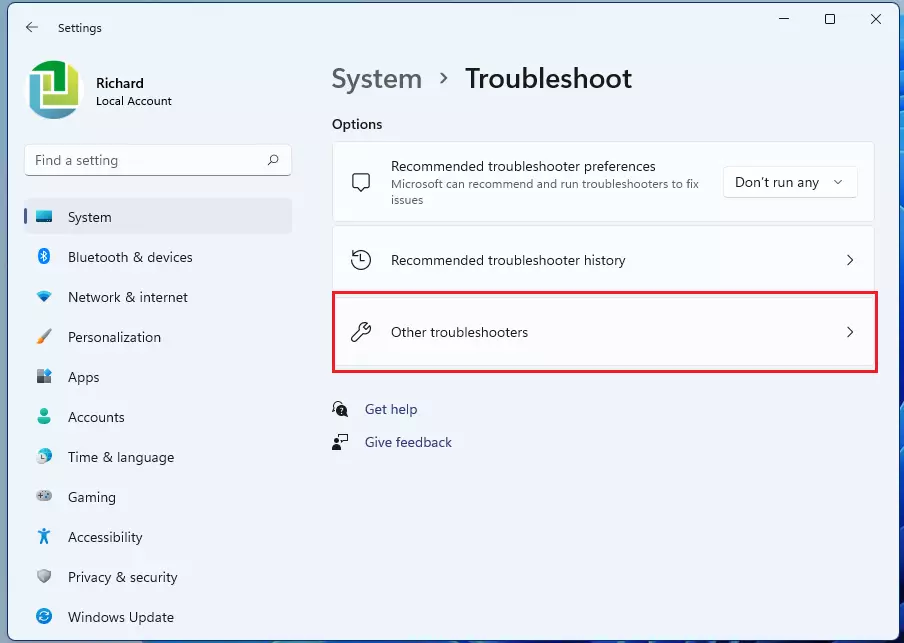
Select Start, and go to Settings > System > Troubleshoot > Other troubleshooters.
Next to the Printer, select Run and follow the instructions.
When you do that, Windows will start diagnosing issues related to your Printer. After a brief moment, depending on your computer, Windows should return with a result.
If one is found, a fix will be done, and Windows will give you detailed reasons. You can then test printing again.
Other helpful posts are listed below:
How to add a printer in Windows 11
How to add a wireless printer in Windows 11
How to install a printer’s latest driver
Conclusion:
To summarize the steps for fixing printer connection and printing issues in Windows 11:
- Check Connections: Ensure all cables are correctly connected using a wired printer, or verify wireless settings if using a wireless printer.
- Remove and Reinstall Printer: If issues persist, consider removing and reinstalling the printer through the Windows settings.
- Run Troubleshooter: Utilize the built-in Printer troubleshooter for diagnosing and resolving printer-related problems.
- Consult Helpful Resources: Refer to additional resources for guidance on installing printers, clearing print queues, and updating printer drivers.
By following these steps, you should be able to resolve most common printing issues in Windows 11.
Leave a Reply