How to Change Account Lockout Duration in Windows 11

Account lockout duration in Windows 11 sets how many minutes your PC stays locked after you type the wrong password too many times. Windows uses this feature to stop automated programs from guessing your password over and over. You can adjust this time using the Local Security Policy tool, which requires Windows Pro, Enterprise, or Education editions.
Open Local Security Policy (secpol.msc) and navigate to Account Policies Account Lockout Policy. Double-click Account lockout duration, enter a value in minutes, and click OK. Alternatively, use the net accounts /lockoutduration: command in Windows Terminal (Admin).
Why Account Lockout Matters
Account lockout matters because it acts as a primary security defense, stopping unauthorized users from repeatedly guessing passwords to gain access to your computer.
Understanding Account Lockout Settings
Windows 11 account lockout settings protect your PC by temporarily disabling user profiles after too many failed password attempts. This feature stops automated guessing tools from cracking your login details. You can control how many wrong tries are allowed and how long the computer stays locked before letting you try your password again.
The account lockout threshold sets how many incorrect passwords Windows allows before locking the account. Security administrators can configure this limit anywhere from 1 to 999 attempts. Setting the account lockout threshold to 0 disables automatic account locking due to excessive failed login attempts.
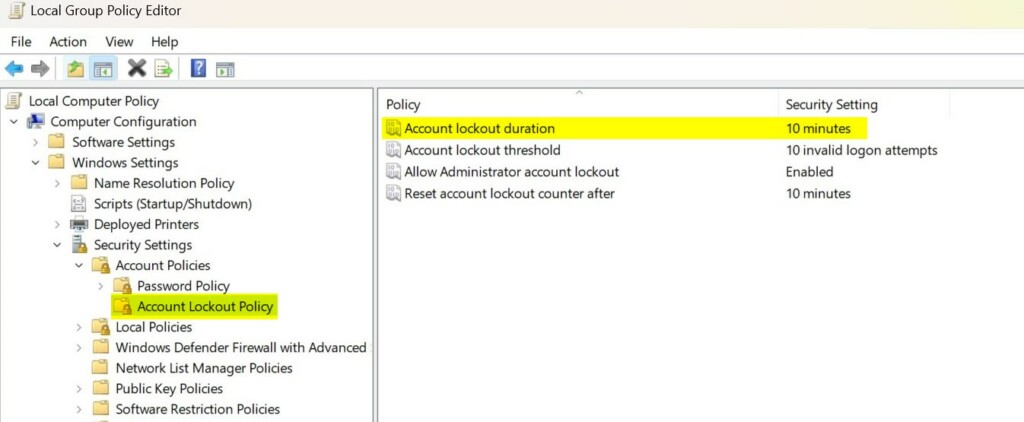
Account lockout duration defines how many minutes an account remains locked before automatically unlocking. Administrators also possess the capability to manually unlock any locked account.
The “Reset account lockout counter after” setting determines how many minutes must pass after a failed login attempt before the count of incorrect login attempts resets to zero. This ensures that a user has a specific window of time to correct their password before the lockout policy is triggered again.
The Administrator account lockout option determines if the primary Administrator account can be locked out. Allowing this lockout prevents unauthorized access to critical system functions for at least 15 minutes, enhancing security after too many failed login attempts.
Default Settings in 🪟 Windows 11
For Windows 11 build 22528 and newer, the default settings are:
- Account lockout threshold: 10 failed attempts
- Account lockout duration: 10 minutes
- Allow Administrator account lockout: Enabled
- Reset account lockout counter after: 10 minutes
⚠️ Admin Required: You must be signed in as an administrator to change these settings.
Important Notes
Malicious actors sometimes attempt to lock out all accounts in an organization by repeatedly entering wrong passwords across various profiles.
Option 1Using Local Security Policy
Local Security Policy lets you change your Windows 11 account lockout duration if you use Windows Pro, Enterprise, or Education editions. You open this built-in tool by typing secpol.msc into the Windows search bar. From there, you navigate to the account policies menu to set how many minutes Windows keeps the account locked.
- Open Local Security Policy. Type
secpol.mscin the search box and press Enter. - In the left pane, double-click Account Policies to expand it, then click Account Lockout Policy.
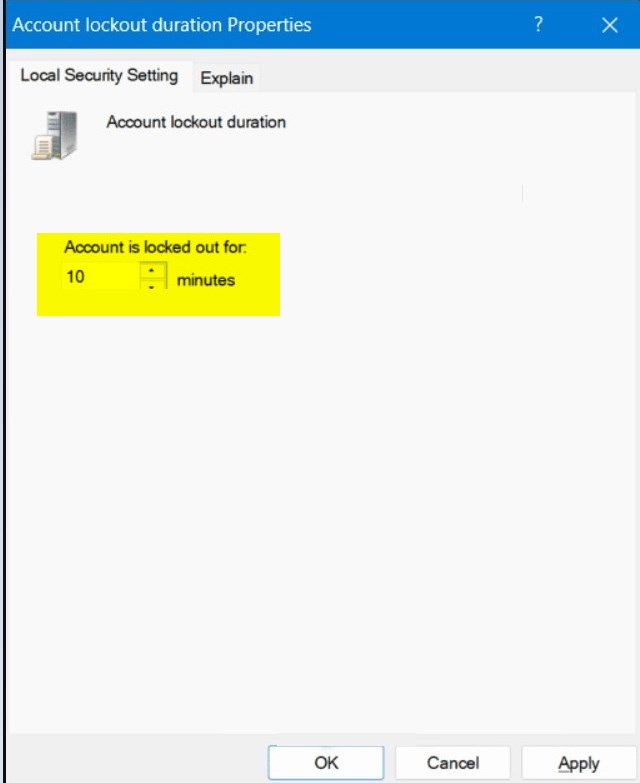
- In the right pane, double-click Account lockout duration to open it.
- Type a number between 0 and 99999 minutes. This is how long the account stays locked. Click OK.
- 0 = The account stays locked until an admin unlocks it
- 10 = The default setting
- If Account lockout duration is lower than Reset account lockout counter after, you will see suggested values. Click OK to accept them.
- If you want, you can also change the Account lockout threshold, Allow Administrator account lockout, and Reset account lockout counter after settings.
- Close Local Security Policy when done.
Account lockout duration must be greater than or equal to Reset account lockout counter after.
Option 2Using Windows Terminal
Windows Terminal lets you change your Windows 11 account lockout duration on Home editions where Local Security Policy is missing. You run a quick command prompt line with administrator rights to set the exact minutes you want the lockout to last. This method works across all versions of Windows 11 without needing extra downloads.
- Right-click the Start menu and select Terminal (Admin), or search for Windows Terminal and run it as admin. Choose either Windows PowerShell or Command Prompt.
- Copy and paste this command, then press Enter to see your current lockout duration:
net accountsLook for the line that says "Lockout duration (minutes)".
- Type this command and press Enter:
net accounts /lockoutduration:<number>Replace <number> with a value between 0 and 99999 minutes. For example:
net accounts /lockoutduration:10 - If you want, you can also change other settings using these commands:
- Account lockout threshold:
net accounts /lockoutthreshold:<number> - Reset account lockout counter:
net accounts /lockoutwindow:<number>
- Account lockout threshold:
- Close Windows Terminal when done.
Lockout duration must be greater than or equal to Lockout observation window.
Summary
Configuring how long a Windows 11 account stays locked after failed login attempts requires either the Local Security Policy tool or Windows Terminal.
References
Account Lockout Policy - Windows 10 - Describes the Account Lockout Policy settings and links to information about each policy setting.
Account lockout duration - Windows 10 - Describes the best practices, location, values, and security considerations for the Account lockout duration security policy setting.
How long is 🪟 Windows 11 account lockout?
What is the default duration of account lockout in Windows? The default is 30 minutes. This keeps the system locked for 30 minutes after several invalid login attempts.
Was this guide helpful?

About the Author
Richard
Tech Writer, IT Professional
Richard, a writer for Geek Rewind, is a tech enthusiast who loves breaking down complex IT topics into simple, easy-to-understand ideas. With years of hands-on experience in system administration and enterprise IT operations, he’s developed a knack for offering practical tips and solutions. Richard aims to make technology more accessible and actionable. He's deeply committed to the Geek Rewind community, always ready to answer questions and engage in discussions.
No comments yet — be the first to share your thoughts!