How to Calibrate HDR Display in Windows 11 for Video

Calibrating an HDR display in Windows 11 fixes washed-out colors and incorrect brightness when you watch HDR videos. This built-in process maps your screen’s exact light limits so movies show deep shadows and bright highlights accurately.
You need Windows 11 version 22H2 or newer to run the official HDR calibration tool. Setting this up takes about five minutes and changes how color looks across media apps on your monitor or laptop screen.
Open the Windows HDR Calibration app and follow the on-screen instructions to adjust luminance sliders for dark, bright, and color saturation patterns. The app will save these settings to your display profile for optimized HDR visuals.
What is HDR Video and Why Calibrate It?
HDR video uses high dynamic range technology to show brighter brights and darker darks than standard video. When you calibrate your HDR display in Windows 11, you adjust the screen so movies and shows display the correct balance of light and shadow, letting you see hidden details in both very bright and very dark areas of the picture.
Standard Dynamic Range (SDR) video has limitations. SDR struggles to show both the brightest and darkest parts of a scene with full detail at the same time. For example, SDR cannot display intense sunlight and dark shadows with equal clarity, making it difficult to see details in either extreme.
High Dynamic Range (HDR) acts as an upgrade. HDR allows your screen to display a much wider spectrum of colors and brightness levels. This wider spectrum translates to more realistic and vibrant images.
- Brighter Brights: Think of sunlight, explosions, or bright lights – they can look much more intense and real.
- Darker Darks: Deep shadows in a night scene can be truly dark, adding depth without losing details within them.
- More Vivid Colors: HDR can show more colors, making them richer and more lifelike.
- Better Detail: You can often see details in both the very bright and very dark areas of the same picture at once, which SDR struggles with.
Display calibration fine-tunes your screen's HDR picture beyond its factory settings. You can control how your screen shows extreme bright and dark areas, allowing you to see every detail in bright scenes or dark areas. Calibration lets you decide the best balance for your viewing preferences.
How to Calibrate Your Built-in HDR Display
Let's get started. Follow these steps to calibrate your Windows 11 laptop's built-in screen for HDR video. These instructions are specifically for your laptop's integrated display.
Step 1Open Display Settings
Press Windows key + I to quickly open the Settings app.
Alternatively, click the Start button and then select the Settings gear icon.

Step 2Go to Display Settings
Within the Settings app, click on System in the left-hand navigation pane.
On the right-hand side, locate and click on Display.
Step 3Find the HDR Settings
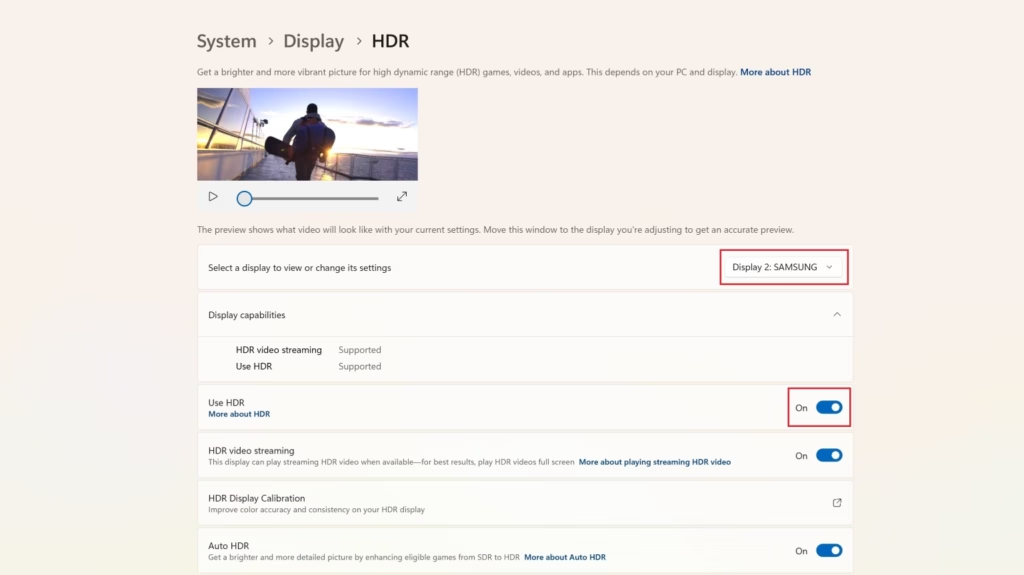
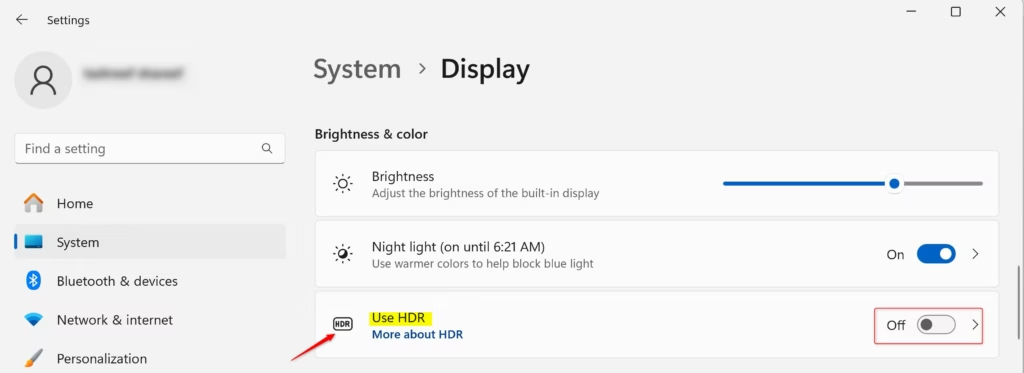
Finding the HDR settings in Windows 11 requires opening the main display menu where you can access video controls. Open Settings, go to System, and select Display. Click on HDR and make sure the Use HDR switch is turned off temporarily, because the Windows HDR Calibration app will not open while HDR is currently turned on.
If Use HDR is turned on, turn it off temporarily so the calibration tool becomes accessible.
Step 4Select Your Built-in Display (If Needed)
Selecting your built-in display ensures you calibrate the correct screen when you have multiple monitors connected to your computer. Click the drop-down menu at the top of the Windows HDR Calibration app and choose your laptop screen or primary monitor before you start adjusting the brightness and color levels.
If you only see your laptop's built-in display, the HDR calibration option won't appear. This behavior is normal when your laptop is not connected to an external HDR monitor. You do not need to take any action because no calibration is required for your laptop's screen itself in this scenario.
Step 5Open the Calibration Tool
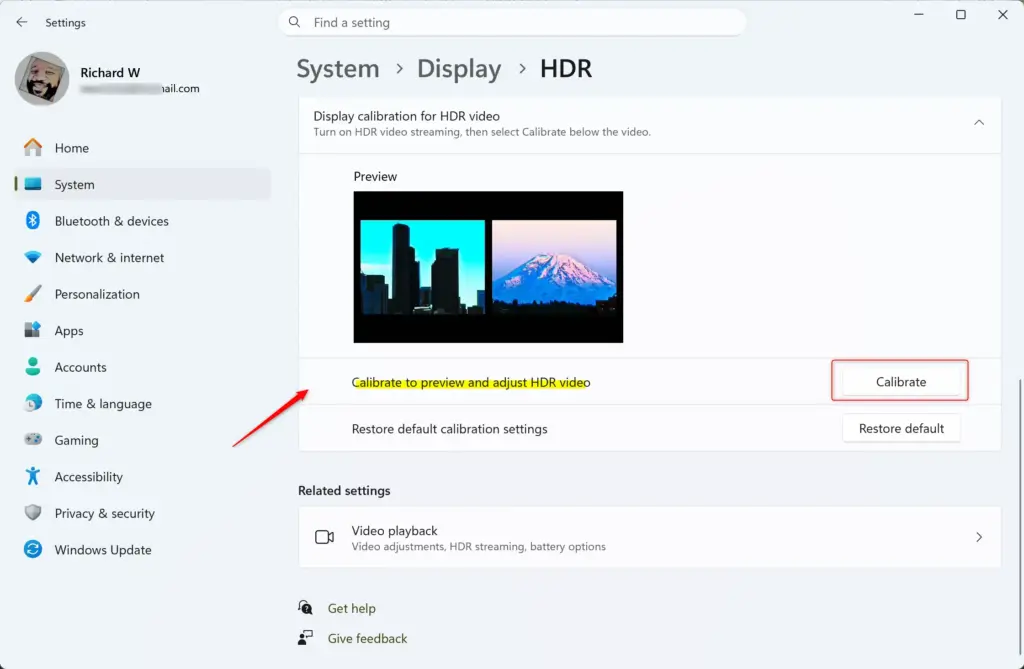
Under "Display calibration for HDR video", click Calibrate.
Keep in mind, this "Calibrate" button only appears if "Use HDR" is off; otherwise, it will be grayed out or absent.
Step 6Calibrate Your Display
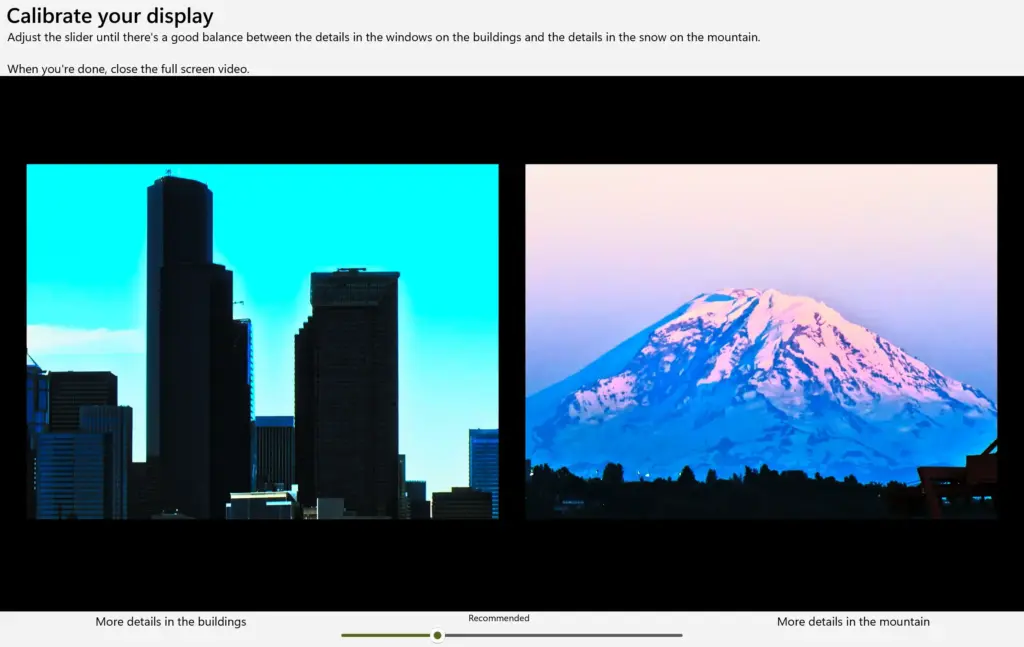
Calibrating your display in Windows 11 involves using a series of test patterns to set the light output of your screen. Drag the slider at the bottom of the Windows HDR Calibration app until the test patterns show clear details in both bright clouds and dark shadows, ensuring videos look natural and balanced.
This slider controls how bright the brightest parts of your HDR video appear. Move the HDR display calibration slider until the image looks its best to you for accurate HDR video playback.
- To show more detail in bright areas, move the slider to the right.
- To show more detail in dark areas, move the slider to the left.
To calibrate your built-in display for HDR video in Windows 11, carefully examine the image and observe how details change. Determine what looks most pleasing to your eyes. There is no single correct answer, as calibration depends on personal preference. You are instructing Windows on how to adjust brightness for specific areas of HDR content.
Step 7Exit the Calibration Tool
Once you're satisfied with the balance, look for an icon in the bottom-right corner of the full-screen image. It typically resembles a square or an "exit full screen" symbol. Click it to close the tool.
Step 8Turn HDR Back On (Optional but Recommended)
Turning HDR back on after finishing your display calibration applies your new color and brightness settings to all supported apps and videos. Go back to Settings, select Display, click HDR, and switch the Use HDR toggle back to the On position to start enjoying your newly calibrated screen.
If you encounter any issues or the picture doesn't appear as expected after turning HDR back on, you can repeat the calibration process or choose to reset to defaults (see below).
Step 9Close Settings
That's it! You've successfully calibrated your built-in HDR display. You can now close the Settings window. Enjoy your improved HDR video experience!
Resetting Default HDR Calibration Settings
There might be times when you want to revert to the factory default settings for your HDR calibration. Perhaps you've made adjustments and are not satisfied, or you wish to start fresh. Windows provides an accessible way to reset your HDR calibration.
Step 1Open Display Settings
Press Windows key + I to open Settings, then navigate to System Display
Step 2Access HDR Settings
Click on the HDR or Use HDR option. Remember, the calibration button is only visible if "Use HDR" is turned off.
Step 3Select Your Built-in Display (If Needed)
If you have multiple screens connected, confirm that your laptop's built-in screen is selected.
Step 4Restore Defaults
Restoring defaults deletes your custom color profile and returns your screen to the factory HDR settings. Open your Display settings, click HDR, and select the Restore default button next to the display calibration option if your picture looks wrong or you want to start the setup process over again.
This action will reset your HDR calibration settings to their original state, as they were when Windows was first set up or when your display drivers were last updated. You will then want to re-enable "Use HDR" if it was previously on.
Step 5Close Settings
The HDR calibration for your built-in display in Windows 11 has been reset to its default configuration. You can now close the Settings app to finish the process.
Summary
Calibrating your built-in HDR display in Windows 11 fixes washed-out colors and restores shadow detail in movies and games. By turning off HDR temporarily, running the official calibration tool, adjusting the test patterns with the slider, and turning HDR back on, you get the most accurate picture possible from your screen.



[…] can run the HDR Calibration app for best picture […]