This article describes the steps to install and use Joomla on Windows with XAMPP support.
Joomla is a popular content management system used for creating websites and applications. While it is usually installed on Linux systems, it is possible to install Joomla on Windows with the help of XAMPP. XAMPP is a free and easy-to-install Apache distribution that includes MariaDB, PHP, and Perl.
Installing Joomla with XAMPP on Windows allows you to create a local web server environment for testing and development purposes. This allows you to create Joomla websites and applications without publishing them to a live server until they are ready.
Additionally, using XAMPP makes installing and configuring the necessary components for running Joomla on Windows easy.
Download XAMPP Package
To install XAMPP on Windows, download the Windows version to the Apache Friends website.

Install XAMPP
After downloading the Windows version, you should be prompted to install the package. Next, you’ll need to install Apache, MySQL, PHP, and Perl, as shown in the image below. Complete the installation and continue to the next step.
Accept the default installation directory: C:\xampp.

Configure XAMPP
Now that the package is installed, open XAMPP and start up Apache and MySQL services, as shown in the image below.

After starting Apache2 and MySQL, these servers should be running. To test whether Apache is running, open Internet Explorer on the host machine and type the URL below:
http://locahost
This should bring up the Apache XAMPP default page.

To validate that MariaDB is installed and functioning, open the Shell command prompt on the right of the XAMPP Control Panel. This should launch the command shell. Then type the commands below:
mysql
This should get you onto the MariaDB database server.

To secure the MariaDB database server, open the Shell command windows again, then type the commands below.
perl\bin\perl.exe mysql\bin\mysql_secure_installation.pl
When prompted, answer the questions below by following the guide.
- Enter current password for root (enter for none): Just press the Enter
- Set root password? [Y/n]: Y
- New password: Enter the password
- Re-enter new password: Repeat password
- Remove anonymous users? [Y/n]: Y
- Disallow root login remotely? [Y/n]: Y
- Remove the test database and access it. [Y/n]: Y
- Reload privilege tables now? [Y/n]: Y
Create Joomla Database
While still in the Shell command windows, type the commands below to log on to the MariaDB database server. Type the password you enter above when prompted.
mysql -u root -p
Then, create a database called Joomla.
CREATE DATABASE joomla;
Create a database user called joomlauser with a new password
CREATE USER 'joomlauser'@'localhost' IDENTIFIED BY 'new_password_here';
Then, grant the user full access to the database.
GRANT ALL ON joomla.* TO 'joomlauser'@'localhost' IDENTIFIED BY 'user_password_here' WITH GRANT OPTION;
Finally, save your changes and exit.
FLUSH PRIVILEGES;
EXIT;
Download Joomla Content
Now that the Joomla database has been created, download Joomla content from its download page.
After downloading the Joomla file, extract it into the C:\xampp\htdocs
You can delete all the files and folders and extract Joomla content from that folder. The docs should look like this:

Configure PHP Settings
Now that Joomla content is in the Apache2 root directory. Go to the path below and open the PHP configuration file.
C:\xampp\php
Then right-click the highlighted PHP configuration file and edit. Then, make the changes below in the file and save. You will have to scroll line by line.

Then change to the following lines below in the file and save.
file_uploads = On
allow_url_fopen = On
memory_limit = 256M
upload_max_filesize = 100M
max_execution_time = 120
max_input_vars = 1500
date.timezone = America/Chicago
Save the file when you’re done.
When done, open Internet Explorer and type the URL below to begin the Joomla installation wizard.

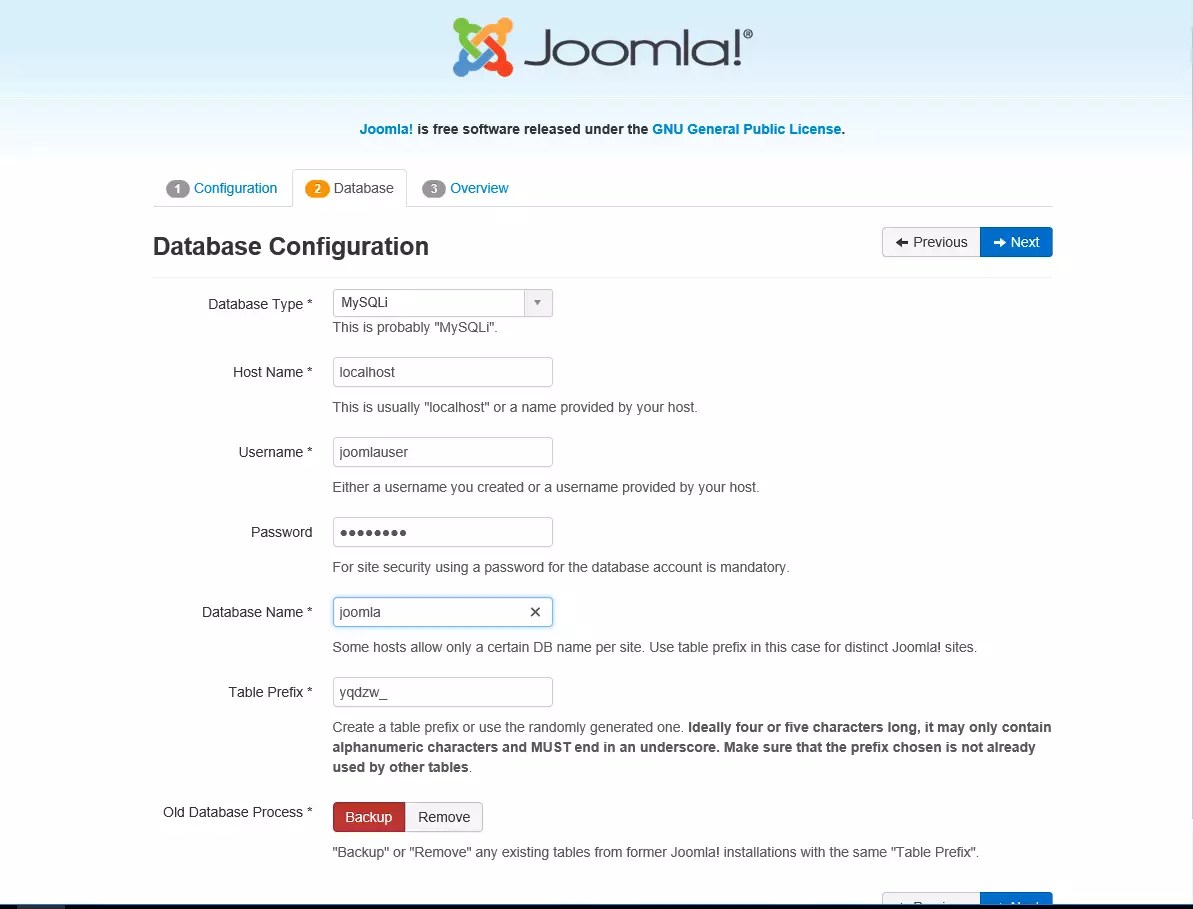
Type the database connection info and continue
Finally, install

Congratulations! You’ve successfully installed Joomla on Windows 10 with XAMPP support.
Enjoy~
Leave a Reply to ZeeshanCancel reply