How to Turn On or Off the Local Network Access Feature in Microsoft Edge
You turn on or off Microsoft Edge’s Local Network Access feature to control which websites can interact with devices on your home network.
This feature acts as a security layer, preventing unauthorized websites from discovering or controlling your local devices, such as smart printers or home automation systems.
Microsoft introduced Local Network Access to enhance browser security for modern web applications that might need to communicate with your home network.
You can enable or disable this setting on Microsoft Edge versions 98 and later, giving you direct control over which sites gain access.
To turn on local network access, go to edge://flags/#local-network-access-check, select “Enabled” or “Enabled (Blocking),” and restart Edge. Then, navigate to Settings > Privacy, search, and services > Site permissions > Local network access, and ensure “Ask before accessing” is on.
Step 1Turning On the Local Network Access Feature
First, you need to make sure this feature is active in your Edge browser. Think of this like turning on the main power switch for the security system.
1. Open Microsoft Edge. Find the blue and green ‘e’ icon and click it.
2. Go to the special settings page. In the address bar at the top, type this and press Enter: edge://flags/#local-network-access-check. This takes you to a hidden settings area.
3. Look for “Local Network Access Checks”. You’ll see this setting. Next to it is a dropdown menu.
4. Choose your setting. You have a few choices:
- Enabled (Blocking): This is the safest. If a website tries to access your network, Edge will stop it immediately. It won’t even ask you.
- Enabled: This option will show you a warning message when a website tries to access your network. You can then choose to allow or deny it. This is good if you use apps that need to connect to your home network.
- Disabled: This turns the feature off. We don’t recommend this because it’s not safe.
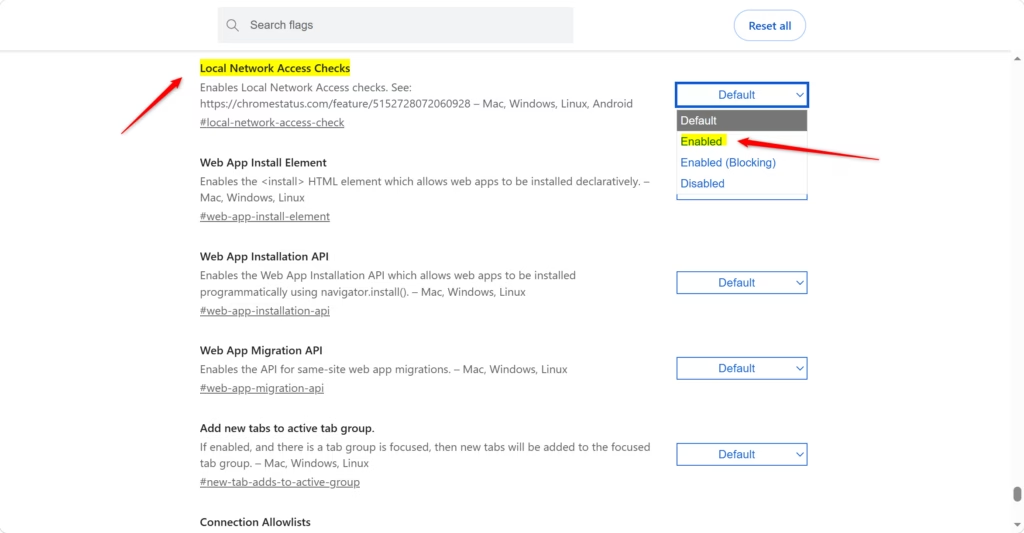
For most people, choosing “Enabled” is a good mix of safety and usefulness. It lets you approve specific requests. If you are very worried about security and don’t think you’ll need this, “Enabled (Blocking)” is a strong choice.
5. Restart your browser. After you choose your setting, a “Restart” button will appear. Click it to make the changes work. Your browser will close and open again.
Step 2Managing Permissions for Specific Websites
Now that the feature is on, you can decide which websites can ask for or get access to your local network. You are the boss here. You’ll manage these settings in Edge’s main Settings menu.
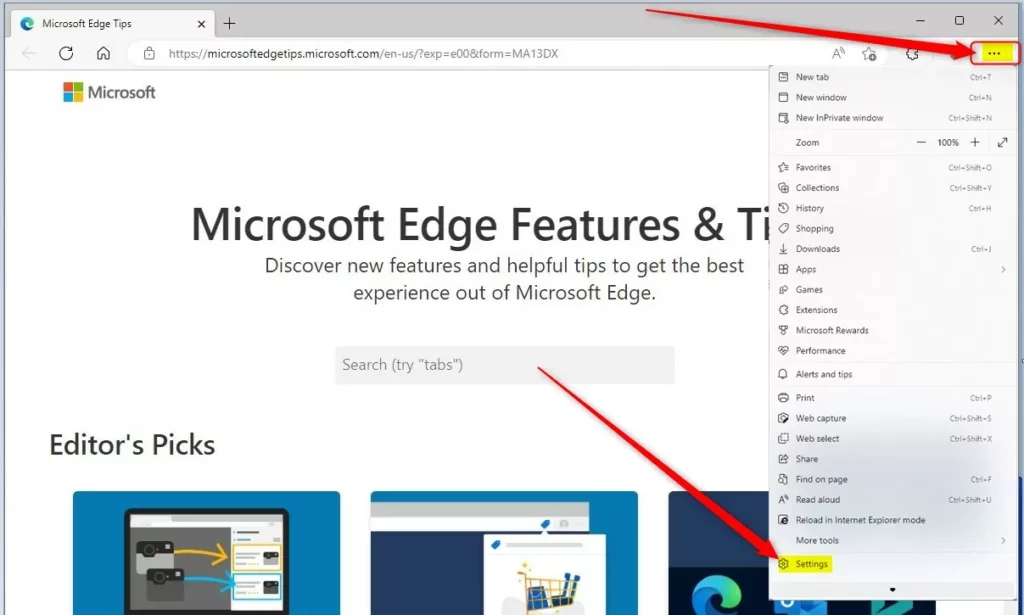
1. Open Microsoft Edge again.
2. Go to Settings. Click the three dots (...) in the top-right corner of the browser window. From the menu that appears, select “Settings”.
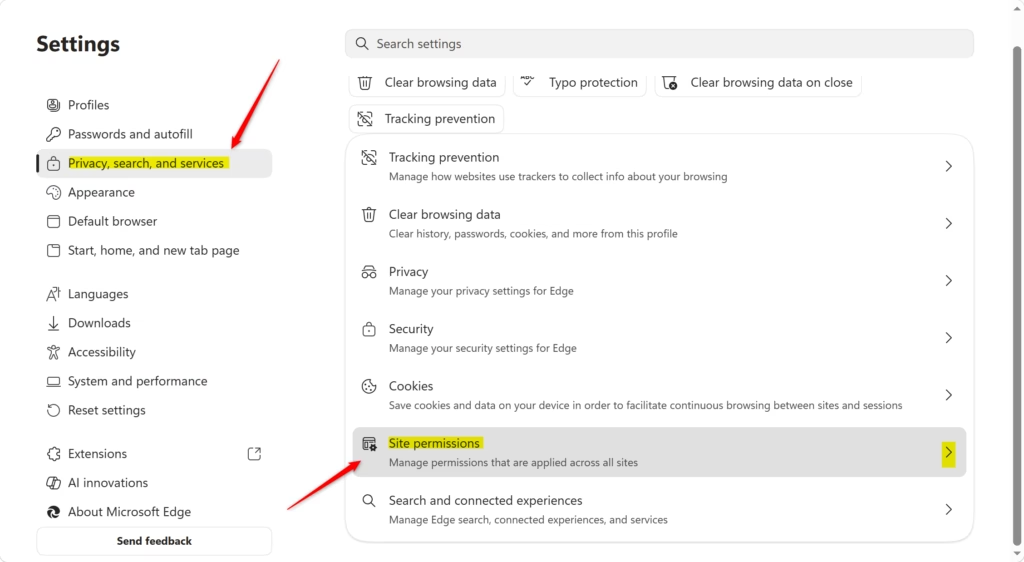
3. Find “Privacy, search, and services”. On the left side of the Settings page, click “Privacy, search, and services”.
4. Go to Site permissions. Scroll down the “Privacy, search, and services” page until you see the “Permissions” section. Click on “Site permissions”.
5. Find “Local network access”. In the list of site permissions, scroll down until you see “Local network access”. Click on it.
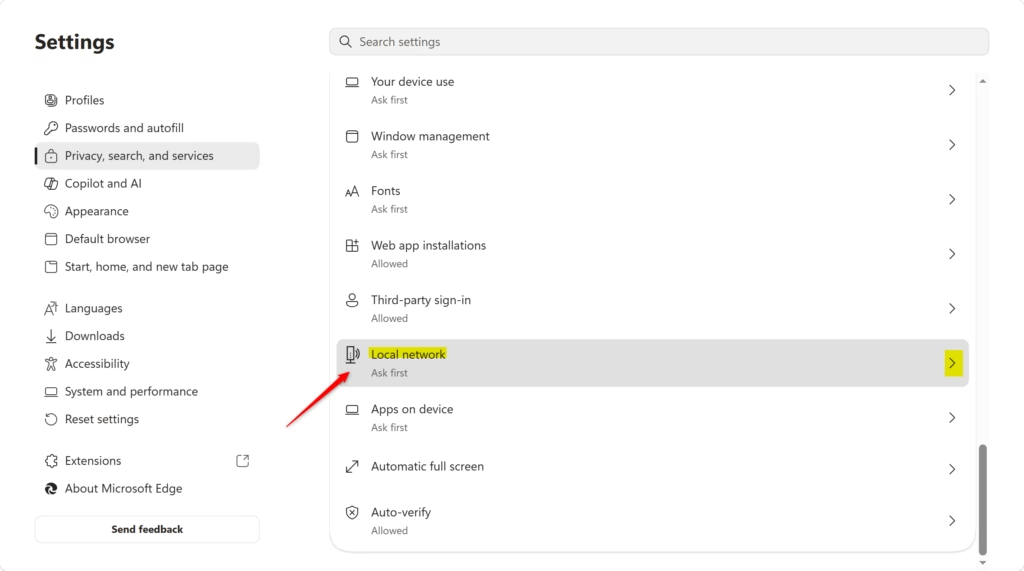
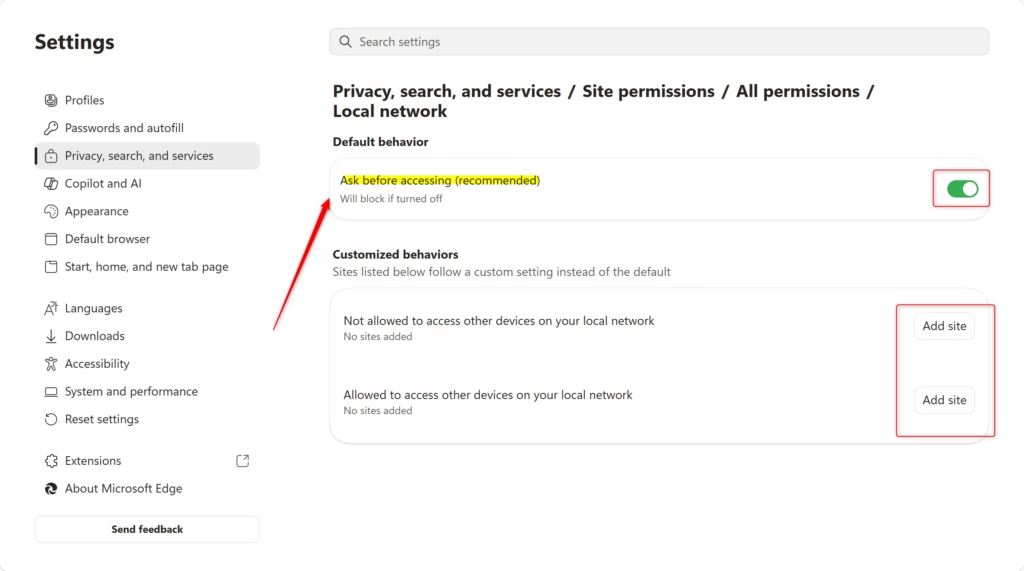
6. Set the main switch. At the top of the “Local network access” page, you’ll see a switch labeled “Ask before accessing (recommended)”. Make sure this switch is ON. This means Edge will ask you before letting any website access your local network.
7. Control permissions for single sites. Below the main switch, you’ll see a list of websites. Some might be allowed, and some might be blocked from accessing your local network. You can add specific sites to an “Allow” list or a “Block” list here.
- To allow a specific site: Click the “Add” button next to “Allowed”. Then type the website’s address (like
https://my-smart-home-app.com). - To block a specific site: Click the “Add” button next to “Blocked”. Then type the website’s address.
Reference:
Summary
Turning on and managing Local Network Access in Microsoft Edge helps protect your home network. By enabling the feature and choosing to be asked for permission, you can control which websites can interact with your devices. You can also create specific lists to allow or block certain websites, giving you fine-grained control over your network’s security.
Was this guide helpful?

About the Author
Richard
Tech Writer, IT Professional
Richard, a writer for Geek Rewind, is a tech enthusiast who loves breaking down complex IT topics into simple, easy-to-understand ideas. With years of hands-on experience in system administration and enterprise IT operations, he’s developed a knack for offering practical tips and solutions. Richard aims to make technology more accessible and actionable. He's deeply committed to the Geek Rewind community, always ready to answer questions and engage in discussions.


No comments yet — be the first to share your thoughts!