How to Remove Copilot App from Windows 11
You can remove the Copilot app from Windows 11 to reclaim screen space and reduce AI interference.
Copilot is Microsoft’s AI assistant that integrates directly into your Windows 11 experience, offering help with various tasks.
However, if you find it disruptive or simply prefer not to use it, you have the power to uninstall it. This process is achievable even for users running the latest Windows 11 23H2 update.
Why Remove Copilot?
Copilot acts as a smart assistant built into Windows. It can help summarize long articles, assist with writing emails, and perform other helpful tasks. However, new features can sometimes be distracting. If Copilot feels too intrusive, or it doesn’t align with how you use your computer, you have the option to remove it. You’re definitely not alone in wanting to do this.
Copilot is installed similarly to other applications. Occasionally, you might find an “Uninstall” button for it directly within your Start menu. However, sometimes after a Windows update, it may reappear. If you’re seeking a more lasting solution, or if you need to remove it from multiple computers, the methods outlined below are what you need.
Method 1: Using Group Policy Editor (For 🪟 Windows 11 Pro, Enterprise, and Education)
If you’re using Windows 11 Pro, Enterprise, or Education, you can utilize the Group Policy Editor. This tool allows you to adjust various settings on your computer, including the removal of Copilot. It’s particularly beneficial if you manage more than one PC.
Step 1: Open the Group Policy Editor
Begin by opening the Run dialog box. Press the Windows key + R keys on your keyboard simultaneously. In the box that appears, type gpedit.msc and then press Enter or click OK. This action will launch the Local Group Policy Editor.
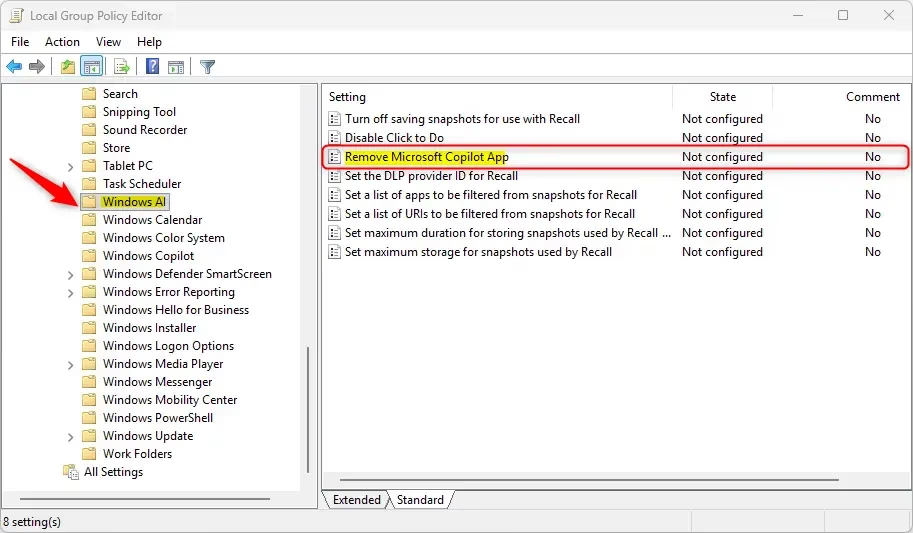
Step 2: Find the Windows AI Policy
Within the Group Policy Editor, navigate the left-hand pane. Click your way through these folders:User Configuration > Administrative Templates > Windows > Components > Windows AI
This path might look a bit complicated, so follow it carefully. The “Windows AI” folder contains settings specifically for AI features within Windows.
Step 3: Enable the “Remove Microsoft Copilot app” Setting
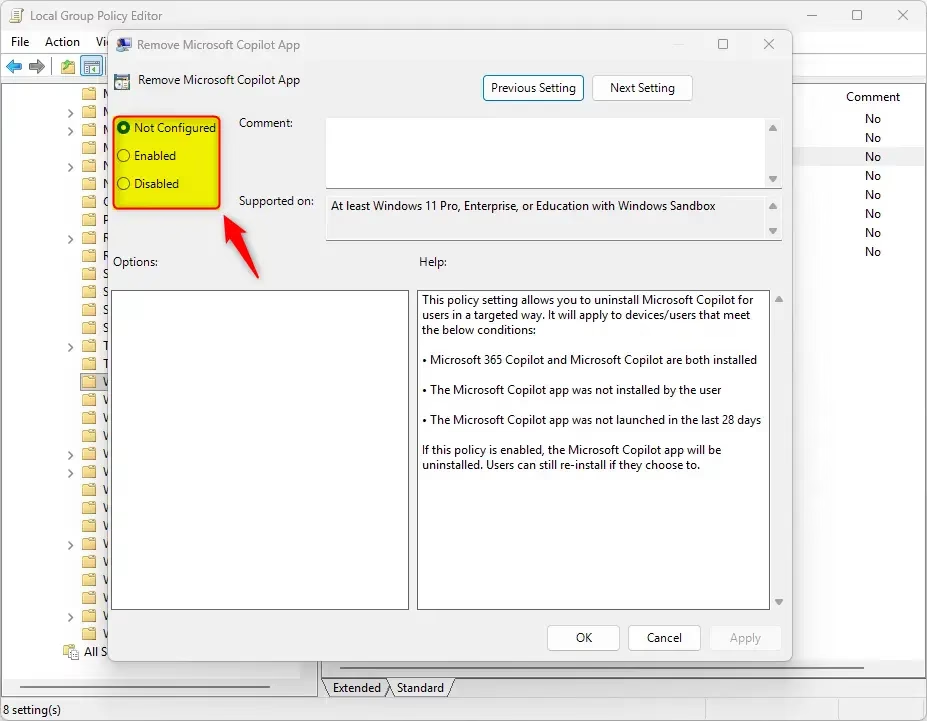
On the right side of the window, locate a setting named “Remove Microsoft Copilot app”. Double-click this entry to open its properties.
A new window appears. To remove Copilot, select the “Enabled” option. It might seem a little counterintuitive to ‘enable’ a setting to remove an app. However, you’re essentially activating the rule that instructs Windows to remove the Copilot application.
After selecting “Enabled,” click “Apply” and then “OK”. This confirms and saves your selection.
Step 4: Restart Your PC or Sign Out
For the change to take effect, you’ll need to restart your computer. Alternatively, you can sign out of your account and then sign back in. This prompts Windows to re-evaluate its current settings.
Tip: This setting doesn’t exclusively target the standard Copilot app. It can also help manage Microsoft 365 Copilot if you have that installed. It’s a comprehensive approach to ensuring Copilot is removed.
Warning: The Group Policy Editor is a powerful utility. Exercise caution and avoid altering settings you don’t fully understand, as this could inadvertently lead to computer issues.
Method 2: Using the Windows Registry Editor (For 🪟 Windows 11 Home and Other Editions)
If you’re using Windows 11 Home, you won’t have access to the Group Policy Editor. However, you can still remove Copilot by modifying settings within the Windows Registry. The Registry is a crucial database that stores your computer’s configuration settings.
Step 1: Open the Registry Editor
As before, open the Run dialog box by pressing Windows key + R. Type regedit and press Enter or click OK. You might encounter a prompt requesting permission (User Account Control). Click “Yes” to proceed.
Step 2: Go to the Right Registry Location
You need to navigate to a specific location within the Registry Editor. On the left-hand side, follow this path:
The exact path you need to navigate to is HKEY_CURRENT_USER\Software\Policies\Microsoft\Windows.
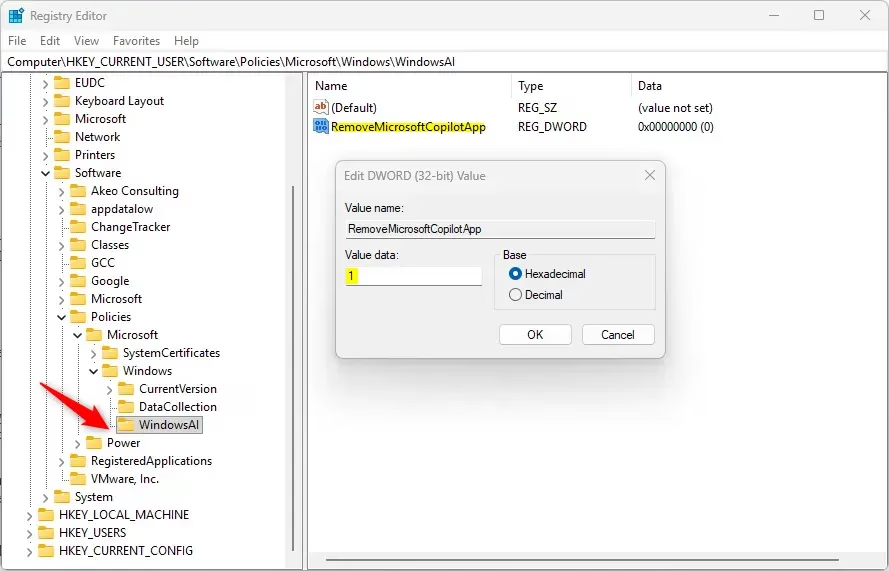
Step 3: Create the “WindowsAI” Key
Once you’ve reached the Windows key, you’ll need to create a new folder, which is referred to as a key. Right-click on Windows in the left pane. Select “New,” then choose “Key.” Name this new key precisely WindowsAI.
Step 4: Create the “RemoveMicrosoftCopilotApp” Value
Now, with the newly created WindowsAI key highlighted, right-click in the blank area on the right side. Select “New,” then choose “DWORD (32-bit) Value.”
Name this new value exactly RemoveMicrosoftCopilotApp.
Step 5: Set the Value to 1
Double-click the RemoveMicrosoftCopilotApp value you just created. A small window will appear. In the “Value data” field, type 1. This numerical input signals Windows to remove the Copilot app. Click “OK” to save this setting.
Step 6: Restart Your PC
Similar to the Group Policy method, you must restart your computer for these Registry modifications to become active. After the restart, Copilot should no longer be visible.
Tip: If you decide you want Copilot back in the future, you can simply delete the RemoveMicrosoftCopilotApp value from the Registry. Alternatively, you can change its “Value data” back to 0.
Warning: Making errors while editing the Windows Registry can lead to significant system problems. Proceed with extreme care and follow these instructions precisely. If you feel uncertain, it’s advisable to create a backup of your Registry before you begin.
Method 3: Using PowerShell (A Quick Scripting Option)
If you’re comfortable working with command-line interfaces, PowerShell offers a quick way to uninstall Copilot. This approach treats Copilot as a standard application package that can be removed using a specific command.
Step 1: Open PowerShell as Administrator
In your Start menu, search for “PowerShell.” Right-click on “Windows PowerShell” and select “Run as administrator.” This grants the command the necessary permissions to uninstall applications.
Step 2: Run the Uninstall Command
In the PowerShell window, copy and paste the following command, then press Enter:
Get-AppxPackage -AllUsers -Name "Microsoft.Windows.Ai.Copilot.Provider" | Remove-AppxPackageThis command searches for the Copilot package across all user accounts on your system and then removes it. You should observe the command executing. If no errors appear, Copilot will be successfully uninstalled.

Step 3: Restart Your PC (Recommended)
This command usually works immediately. However, it’s always a good idea to restart your PC after making these kinds of changes to ensure everything is applied correctly.
Tip: This method is efficient for uninstalling. However, as noted, Windows updates may reintroduce Copilot. If this occurs, you might need to rerun this script, or opt for the Group Policy or Registry methods for a more enduring solution.
Warning: Ensure you copy the command precisely as it is written. Typos can lead to incorrect actions or unintended consequences.
A Final Check: Can You Still Uninstall Normally?
Before diving into the more complex methods, it’s always worthwhile to check if the direct uninstall option is readily available. Microsoft has enhanced the process for uninstalling Copilot directly from the Start menu in recent updates.
How to Check:
- Click the Start button.
- Type “Copilot” in the search bar.
- When the Copilot app shows up, right-click on it.
- Look for an “Uninstall” option.
If you see this option, you can click it and follow the on-screen prompts to remove Copilot. This is the most direct route if it’s applicable to your system.
Why this might not be enough: As previously mentioned, this direct uninstall might not always offer a permanent solution, particularly after significant Windows updates. The Group Policy and Registry methods provide a more robust way to prevent Copilot from reappearing.
Summary
This guide details how to remove the Microsoft Copilot app from Windows 11. It presents three distinct methods: utilizing the Group Policy Editor (for Pro, Enterprise, and Education editions), modifying the Windows Registry (for Home edition and others), and employing a PowerShell script. Each method includes step-by-step instructions, warnings regarding potential risks, and helpful tips for managing Copilot’s presence. The guide also advises checking for a direct uninstall option in the Start menu first, though it recommends the more advanced methods for a more permanent resolution.
Can I completely remove Copilot from 🪟 Windows 11?
Yes, you can completely remove Copilot from Windows 11. While a direct uninstall option isn't always available, methods like using the Group Policy Editor or PowerShell allow for its removal, even after Windows updates. This ensures it doesn't reappear unexpectedly.
How to disable Copilot?
To disable Copilot, right-click the taskbar and select 'Copilot (preview)' to uncheck it. For a more permanent solution, especially if it reappears, use the Group Policy Editor or PowerShell to disable and remove it entirely from your Windows 11 system.
How do I completely remove an app from 🪟 Windows 11?
To completely remove an app from Windows 11, go to Settings > Apps > Installed apps. Find the app, click the three dots, and select 'Uninstall'. For apps that don't offer this option, like some built-in ones, you may need to use PowerShell or Group Policy Editor.
Why can't I Uninstall some Apps on 🪟 Windows 11?
Some apps on Windows 11, particularly system-integrated ones like Copilot or Microsoft Edge, cannot be uninstalled through the standard Settings app. These are often considered essential for Windows functionality and require advanced methods like PowerShell or Group Policy Editor for removal.
Was this guide helpful?

About the Author
Richard
Tech Writer, IT Professional
Richard, a writer for Geek Rewind, is a tech enthusiast who loves breaking down complex IT topics into simple, easy-to-understand ideas. With years of hands-on experience in system administration and enterprise IT operations, he’s developed a knack for offering practical tips and solutions. Richard aims to make technology more accessible and actionable. He's deeply committed to the Geek Rewind community, always ready to answer questions and engage in discussions.


No comments yet — be the first to share your thoughts!