This article explains how to turn on or off the “Hide pointer while typing” feature in Windows 11.
By default, Windows will hide the mouse pointer when you are typing. This ensures the mouse pointer doesn’t get in the way while typing with your keyboard.
There are other mouse features that one can turn on or off, such as turning on or off mouse pointer trailing, showing mouse pointer location, and more. All these features are there to help you enhance your experience with Windows.
If you do not want to permanently hide the mouse pointer when typing, the steps below show you how to turn it off or on in Windows 11.
Although you can enable or disable this feature, it’s still up to the apps to honor this setting, and not all apps are compatible.
Choose to show or hide the mouse pointer while typing via Control Panel
As described above, Windows lets you show or hide the mouse pointer while typing. This setting is available. However, it’s still up to the apps to honor it, and not all apps are compatible.
Here’s how to turn it on or off in Windows.
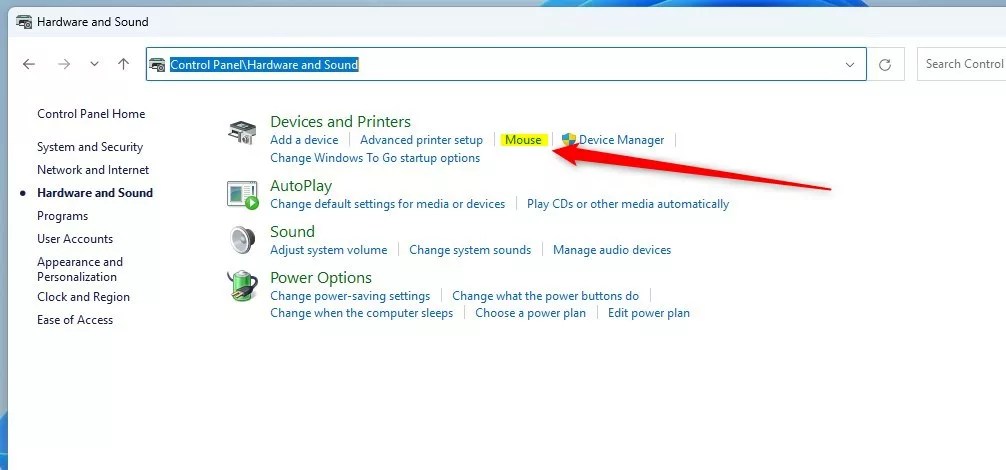
First, open the Control Panel.
Then go to the Control Panel -> Hardware and Sound section, and select the Mouse link.
On the Mouse Properties window, select the Pointer Options tab. On the Pointer Options tab, under Visibility, check to turn on and uncheck to turn off the “Hide pointer while typing” feature.

Click the OK button to save your settings and exit.
Enable or disable hide pointer while typing using the Windows registry editor.
Yet another way to show or hide the mouse pointer while typing is to use the Windows registry editor.
First, open the Windows registry editor. Then, go to the folder key listed below.
HKEY_CURRENT_USER\Control Panel\Desktop

In the right pane of the Desktop key, double-click on the UserPreferencesMask binary value (REG_BINARY) to modify it.
The Hide pointer while typing setting and others are saved together in the UserPreferencesMask binary value 0 = disable (show), 1 = enable (hide), default 1 17 – 00 00 02 00 = 0x00020000

Save your change and exit.
That should do it!
Conclusion:
This post showed you how to show or hide the pointer while typing in Windows 11. Please use the comment form below if you find any errors above or have something to add.
Leave a Reply