How to Remove Copilot App from Windows 11
Microsoft’s Copilot is now part of Windows 11. It’s meant to help you with tasks using AI right on your computer. But what if you don’t like it? Maybe it gets in your way, or you just want a simpler screen. Good news! You can remove Copilot. This guide shows you how, with different ways for different Windows 11 versions.
Why Remove Copilot?
Copilot is like a smart helper built into Windows. It can do things like summarize long articles, help you write emails, and other tasks. But sometimes, new features can be distracting. If Copilot feels too intrusive, or it just doesn’t fit how you use your computer, you can remove it. You’re not alone in wanting to do this.
Copilot is installed like other apps. Sometimes, you might see an “Uninstall” button for it right in your Start menu. But sometimes, after a Windows update, it might come back. If you want a more permanent fix, or you need to remove it from many computers, the methods below are what you need.
Method 1: Using Group Policy Editor (For 🪟 Windows 11 Pro, Enterprise, and Education)
If you have Windows 11 Pro, Enterprise, or Education, you can use a tool called the Group Policy Editor. This tool lets you change many settings on your computer, including removing Copilot. It’s especially useful if you manage more than one PC.
Step 1: Open the Group Policy Editor
First, open the Run box. Press the Windows key + R keys on your keyboard together. Type gpedit.msc into the box and press Enter or click OK. This will open the Local Group Policy Editor.
Step 2: Find the Windows AI Policy
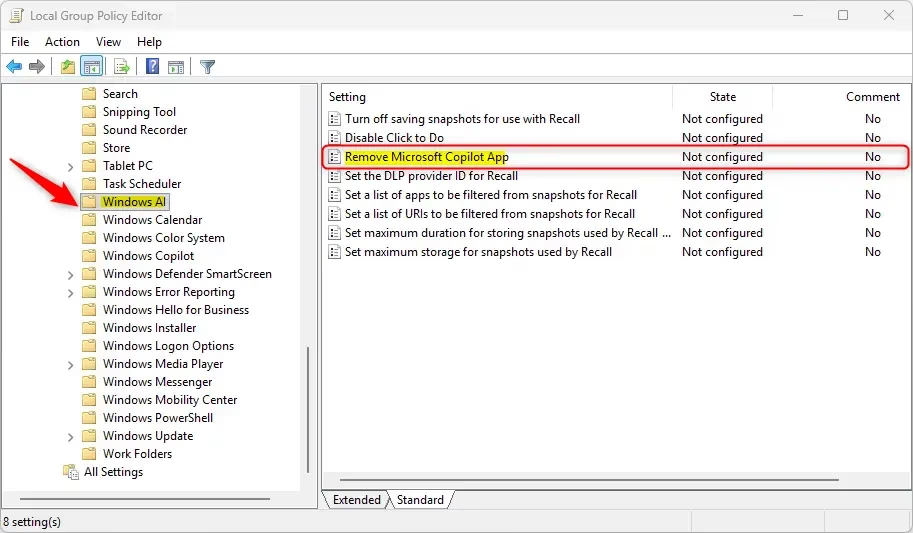
In the Group Policy Editor, look in the left-hand side. Click through these folders:User Configuration > Administrative TemplatesWindows > Components > Windows AI
This path might look a bit complicated, but follow it carefully. The “Windows AI” folder holds settings for AI features in Windows.
Step 3: Enable the “Remove Microsoft Copilot app” Setting
On the right side of the window, find a setting called “Remove Microsoft Copilot app”. Double-click on it.
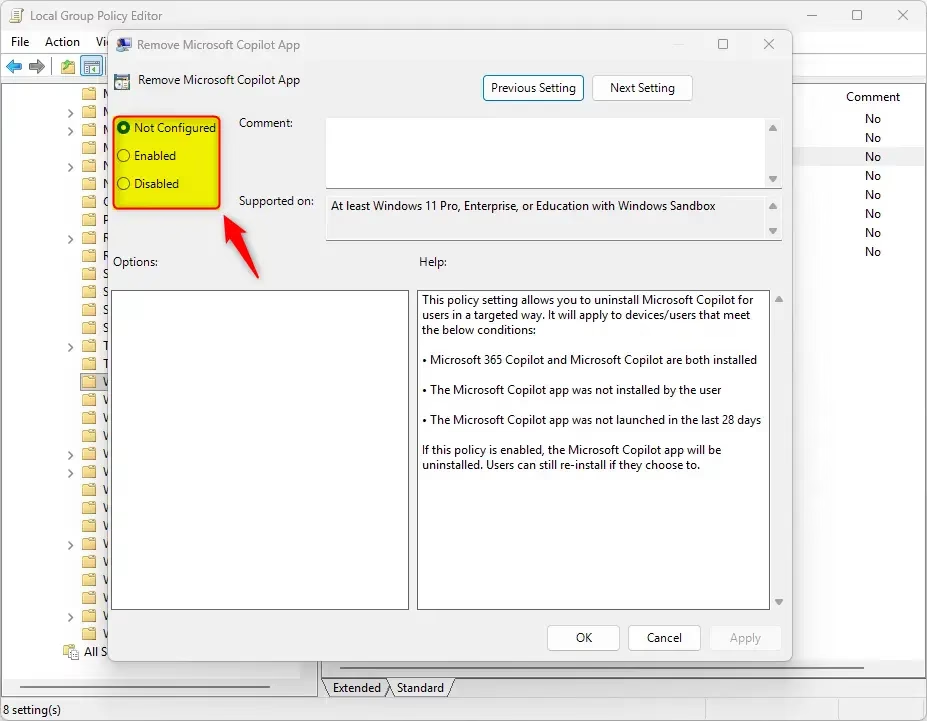
A new window will open. To remove Copilot, choose the “Enabled” option. It might seem strange to “enable” a setting to remove something. But you are enabling the rule that tells Windows to remove the Copilot app.
After clicking “Enabled,” click “Apply” and then “OK”. This saves your choice.
Step 4: Restart Your PC or Sign Out
To make the change work, you need to restart your computer. You can also sign out of your account and sign back in. This makes Windows check the new settings.
Tip: This setting doesn’t just remove the regular Copilot app. It can also help manage Microsoft 365 Copilot if you have that installed. It’s a good way to make sure Copilot is gone.
Warning: The Group Policy Editor is a powerful tool. Be careful not to change settings you don’t understand. You could accidentally cause problems with your computer.
Method 2: Using the Windows Registry Editor (For 🪟 Windows 11 Home and Other Editions)
If you have Windows 11 Home, you can’t use the Group Policy Editor. But you can still remove Copilot by changing settings in the Windows Registry. The Registry is a special database for your computer’s settings.
Step 1: Open the Registry Editor
Like before, open the Run box by pressing Windows key + R. Type regedit and press Enter or click OK. You might see a message asking for permission (User Account Control). Click “Yes” to continue.
Step 2: Go to the Right Registry Location
You need to go to a specific spot in the Registry Editor. In the left-hand side, follow this path:HKEY_CURRENT_USER\Software\Policies\Microsoft\Windows
The full path you need to reach is HKEY_CURRENT_USER\Software\Policies\Microsoft\Windows.
Step 3: Create the “WindowsAI” Key
Once you are at the Windows location, you need to add a new folder (called a key). Right-click on Windows in the left pane. Choose “New,” then click “Key.” Name this new key exactly WindowsAI.
Step 4: Create the “RemoveMicrosoftCopilotApp” Value
Now, with the new WindowsAI key selected, right-click in the empty space on the right side. Choose “New,” then select “DWORD (32-bit) Value.”
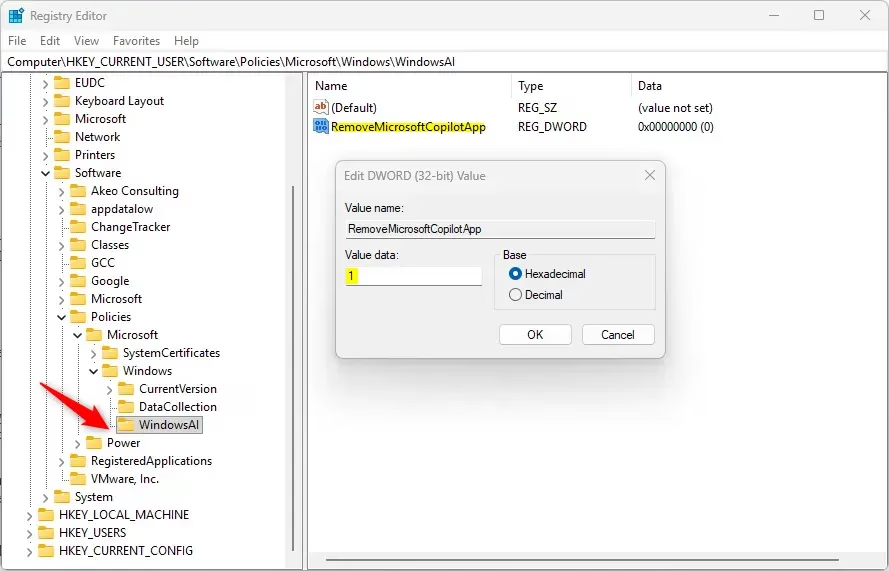
Name this new value exactly RemoveMicrosoftCopilotApp.
Step 5: Set the Value to 1
Double-click on the RemoveMicrosoftCopilotApp value you just made. A small window will pop up. In the “Value data” box, type 1. This tells Windows to remove the Copilot app. Click “OK” to save this.
Step 6: Restart Your PC
Just like with the Group Policy method, you must restart your computer for these Registry changes to work. After restarting, Copilot should be gone.
Tip: If you want Copilot back later, you can delete the RemoveMicrosoftCopilotApp value from the Registry. Or, you can change its “Value data” back to 0.
Warning: If you make mistakes when editing the Windows Registry, it can cause serious problems with your computer. Follow these steps very carefully. If you are not sure, make a backup of your Registry before you start.
Method 3: Using PowerShell (A Quick Scripting Option)
If you are comfortable using command lines, PowerShell can quickly uninstall Copilot. This method treats Copilot like any other app package that can be removed with a command.
Step 1: Open PowerShell as Administrator
Search for “PowerShell” in your Start menu. Right-click on “Windows PowerShell” and choose “Run as administrator.” This gives the command the permissions it needs to uninstall apps.
Step 2: Run the Uninstall Command
In the PowerShell window, copy and paste the following command and press Enter:
Get-AppxPackage -AllUsers -Name "Microsoft.Windows.Ai.Copilot.Provider" | Remove-AppxPackageThis command looks for the Copilot package on your system for all users and then removes it. You should see the command run. If there are no errors, Copilot will be uninstalled.

Step 3: Restart Your PC (Recommended)
This command usually works right away. However, it’s always a good idea to restart your PC after making these kinds of changes. This helps make sure everything is applied correctly and any running processes are cleared.
Tip: This method is fast for uninstalling. But, as mentioned, Windows updates might bring Copilot back. If that happens, you might need to run this script again, or use the Group Policy or Registry methods for a more lasting solution.
Warning: Make sure you copy the command exactly as it is written. Typing errors can cause mistakes or actions you didn’t intend.
A Final Check: Can You Still Uninstall Normally?
Before trying the more advanced methods, it’s always worth checking if the simple uninstall option is available. Microsoft has made it easier to uninstall Copilot directly from the Start menu in recent updates.
How to Check:
- Click the Start button.
- Type “Copilot” in the search bar.
- When the Copilot app shows up, right-click on it.
- Look for an “Uninstall” option.
If you see this option, you can click it and follow the steps to remove Copilot. This is the easiest way if it works for your computer.
Why this might not be enough: As mentioned before, this direct uninstall might not always be permanent, especially after big Windows updates. The Group Policy and Registry methods offer a stronger way to stop Copilot from coming back.
Summary
This guide explains how to remove the Microsoft Copilot app from Windows 11. It offers three methods: using the Group Policy Editor (for Pro, Enterprise, Education editions), editing the Windows Registry (for Home edition and others), and using a PowerShell script. Each method includes step-by-step instructions, warnings about potential risks, and tips for managing Copilot’s presence. The guide also suggests checking for a direct uninstall option in the Start menu first, although advanced methods are recommended for a more permanent solution.
Was this guide helpful?
No comments yet — be the first to share your thoughts!